Sunday, May 18, 2014

My "thank you" card for Marti!!!!

Hello everyone.......hope you are having a wonderful Sunday!!!  I don't know about your weather, but here in North FL the sun is shinning and it is a beautiful day!

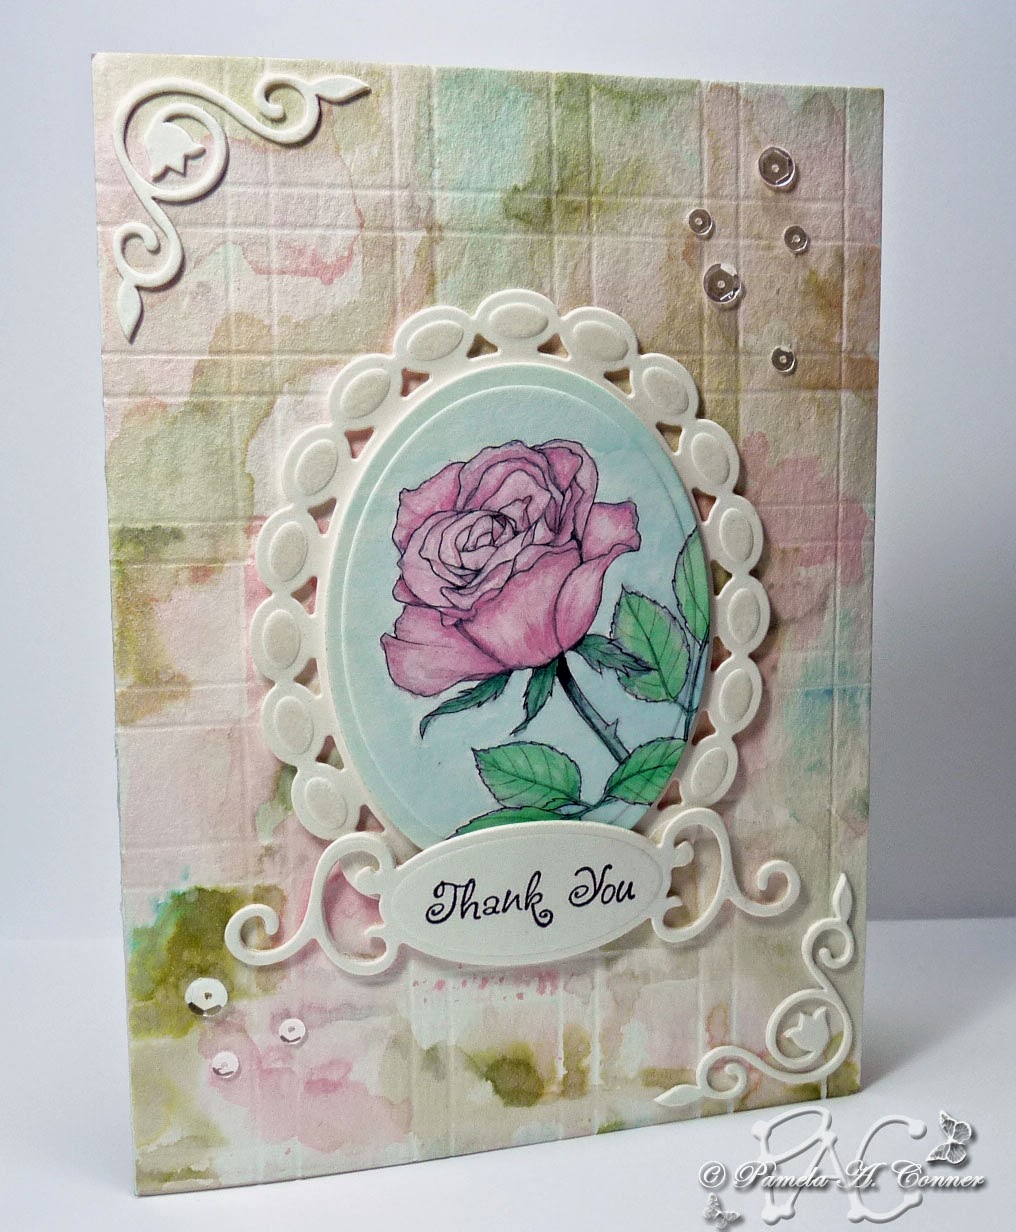
I've been taking the "Online Watercolor Class" hosted by Kristina Werner, Jennifer McGuire and Jennifer Rzasa  at onlinecardclasses.com and I have to tell you that I have really enjoyed it and I've learned a lot!!!  You really ought to check it out......just click on the link I've provided above!  Well, I decided to try to watercolor a digital image and I decided to use one of my Dover "free" images of a really pretty rose.  I did not know if this would work or not, because I was afraid since I was going to print it on watercolor paper on my Canon printer that the ink would bleed..........but lo and behold it did not!  Right after printing it, I did zap it with my heat gun.......maybe that helped!  I don't have any really good watercolors...I just used my Loew Cornell "Simply Art" set of 36 colors and actually they worked just fine.  I did use my Tim Holtz "Broken China" Distress Ink behind the rose.  Well, after doing that rose, I just had to use it on a card and last Wednesday one of my very best friends, Marti, gave me a wonderful hair cut.........she has been cutting my hair for over thirty years, in fact, that is how we met.  Of course she has been retired for many years but still cuts my hair...I swear she is a sculptor and an artist!!!  At any rate, I told her about my watercolor class and I told her that the first project I complete would go on a special card for her and it has!  

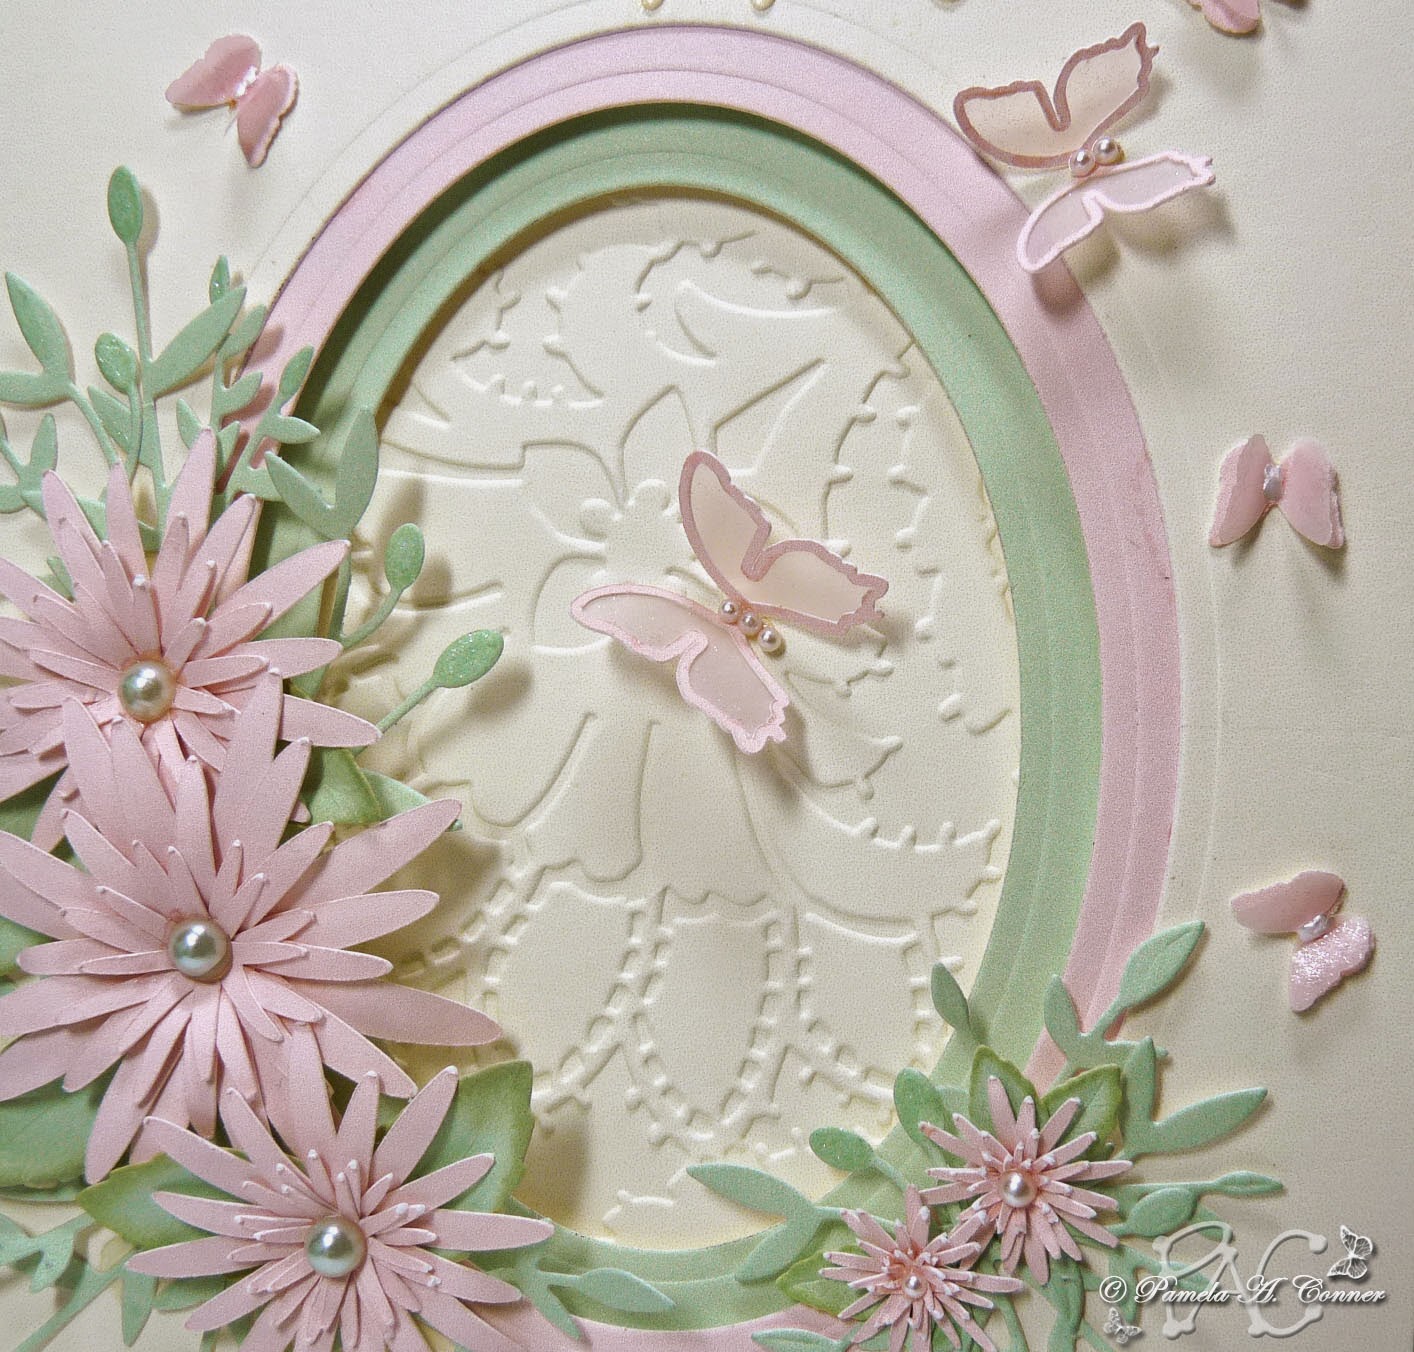
Now, let me tell you about my background for the card.  Yesterday was "Bonus Day" for my class and one of the guests designers that did a video showing a technique was one of my favorite people in the crafting community......Miss Laura Sterckx who is only 17 years old and lives in Belgium with her parents.  You must check out her blog and then her YouTube Channel....I watch her videos every week! The technique she chose to share was using Distress Inks misted with water to make like a marbled background on watercolor paper that she has scored and I loved it!!!  I chose to use "Spun Sugar", "Forest Moss" and "Broken China" and then when it was dry I used some Heidi Swapp "White" Color Shine and I love how it turned out!!!  I also used some pearl embossing powder and heat set it on the beads around the oval frame.  What do you think?!!!


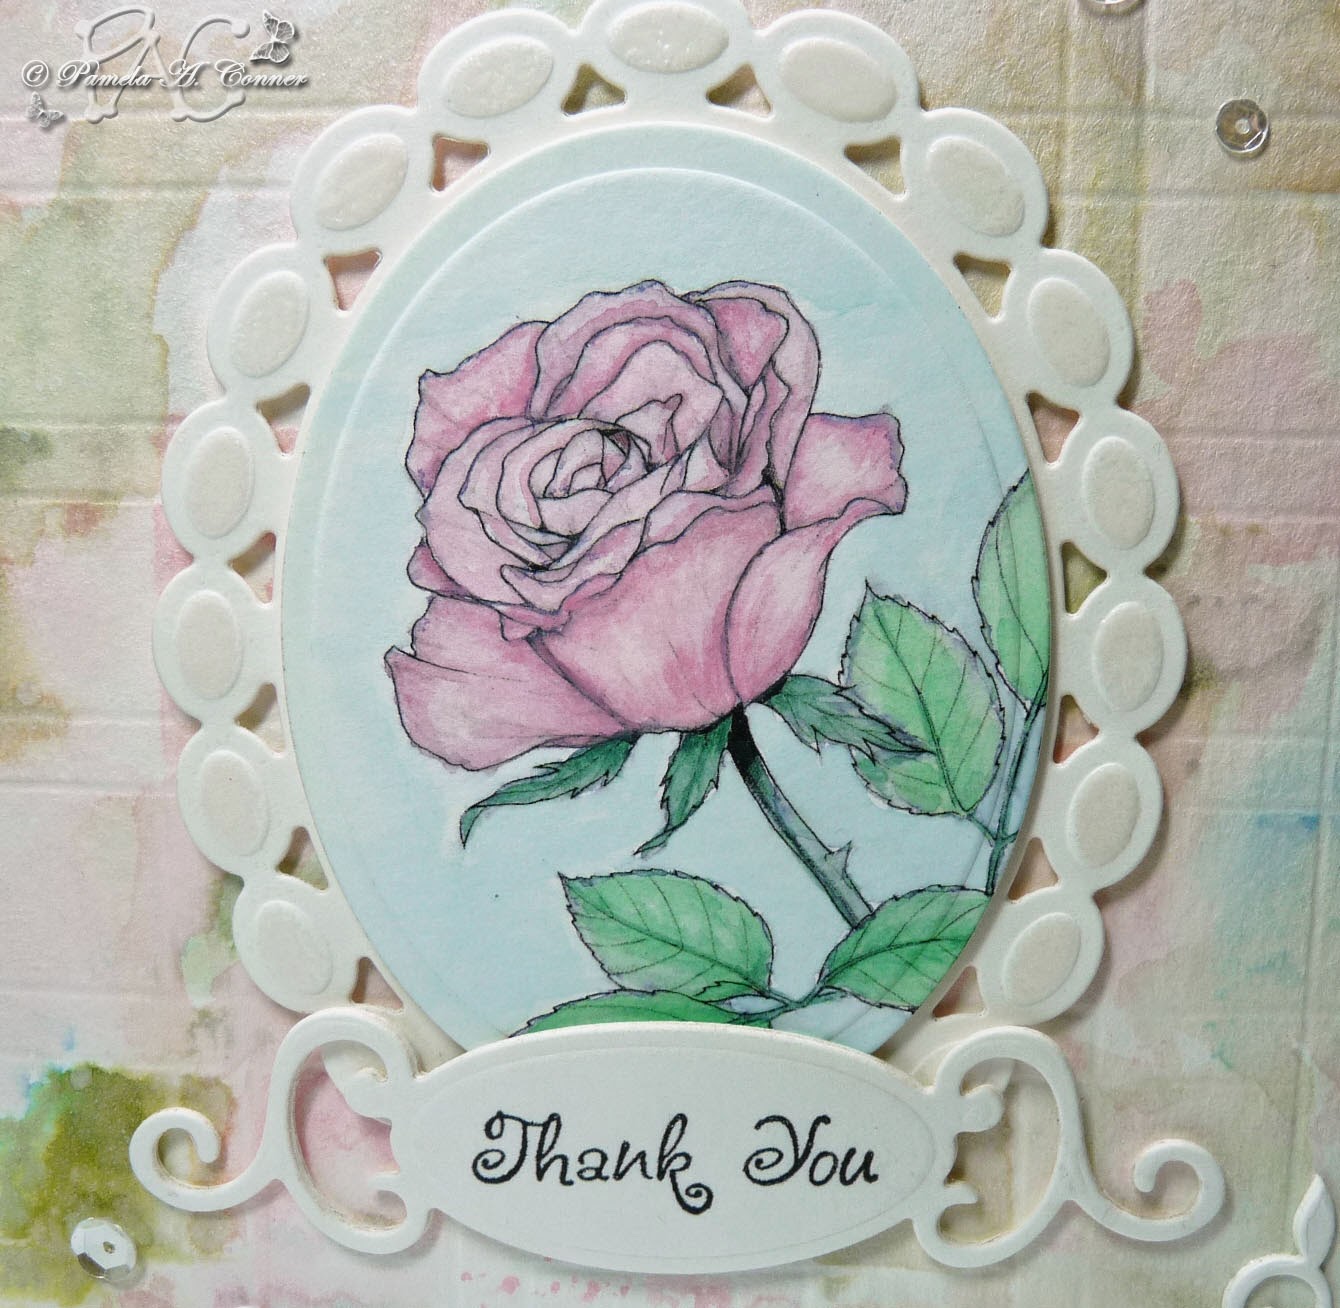
And here is a close-up of my water coloring.


Well, next I was trying to figure out what to do for the inside of the card and I decided to make a panel for the back of the card like I did for the background on the front and then scan it to make a background for the inside of the card and I love how it turned out!  Here are a couple of photos.


Y'all this was so much fun to make.  Thank you Miss Laura for the background technique.....I am in love with it!!!  She is also the one that introduced me to the gorgeous "Sparkling Clear" sequins from Pretty Pink Posh!  I would really love to hear your comments on this one!


Supplies List
Papers:  Canson "140 LB Cold Press Watercolor Paper", Recollection 110 LB "Ivory" 
Stamps:  Inkadinkado "Thank You" from the Spring Blossoms Clear Stamp Set
Ink:  Tsukineko Versafine "Onyx Black", Tim Holtz "Broken China", "Forest Moss" & "Spun Sugar"
Tools:  Silhouette "Cameo",  Pazzles "Inspiration", Range "Heat-It", Sizzix "Big Shot", Martha Stewart "Score Board" & "Stamp Mount" 
Accessories:  Loew Cornell "Simply Art" Watercolors, "White" Heidi Swapp  Color Shine, "Sparkling Clear" Pretty Pink Posh sequins, Spellbinders Dies, Cuttlebug "Corners", Stamp-n-Stuff "White Pearl Translucent" embossing powder

Friday, May 9, 2014

47 down..........................

My oldest son is going to love this and I know y'all are wondering what in the world I am talking about!  On the same day that my grandson turns 12, my oldest son is turning 47....they actually share the same birthday!  My inspirations for this card design came from two Splitcoast Stampers challenges.....the first being the Color Challenge for this week (CC477) which called for us to use Black, White and Pool Party and the "dessert" was to use stenciling and the second being the Sketch Challenge for this week (SC487) and here is an image of it!


I decided I definitely wanted do the stenciling, so I made a chevron stencil out of quilter's plastic using my Sizzix eClips.  I don't own  Stampin' Up "Pool Party" ink, so I substituted some Hero Arts "Soft Pool" ink to mix in with my embossing paste and went from there.  I thought the color came out really close!  I designed and printed my striped paper using my Silhouette Studio software using the codes for the challenge colors.  For the top "circle" I took a piece of white cardstock and used some "Ocean" and "Splash" Mister Huey's Color Mists and and to top it off I used just a little Heidi Swapp "Gold" Color Shine.  I'm afraid my photo does not do it justice!  I then used my Spellbinders "Circles" and my Big Shot to cut the circles.  The "3 MORE TO GO...." was done using a Silhouette Sketch Pen and the "LDT Funky" font....for the "47 down" I used the "Birch Std" font.  I used my "Clear" Wink of Stella Brush Tip Marker to "glitter" the black stripes, the scalloped circle, the black base of the "47" and "down".  To finish off my card I used some "Sparkling Clear" Pink Posh sequins....love them!  Here are a couple of photos!


And here is a photo of the inside....that way you will understand the "47 down"...lol  I should have used a different font as the "LDT Funky" font is a "thin line" font and it did not show up quite dark enough....I used the "2 Peas Mr. Giggles" font for the "Happy Birthday".


I normally do not like making masculine cards...but this one was actually fun and I think that color combo for a male is really good!  Thanks for stopping by and hurry back!


Supplies List
Papers:  Bazzill "Black", Recollection 110 LB "White" 
Ink:  "Soft Pool" Hero Arts Shadow Ink
Tools:  Silhouette "Cameo",  Sizzix eClips"
Accessories:  Dreamweaver "Embossing Paste", Spellbinders "Circles" dies, Pretty Pink Posh "Sparkling Clear" Sequins, "Clear" Wink of Stella Brush Tip Marker, "Ocean" & "Splash" Mister Huey's Color Mists, "Gold" Heidi Swapp  Color Shine

What DOES the fox say???

Hey y'all!!!  Remember my little fox from my post on April 30?  Well, I did it...I turned him into a birthday card for my soon-to-be 12 year old grandson!  It is also my card for the Splitcoast Stamper's May 2nd "Free 4 All" Challenge (keyword F4A219) where you are to use some form of wood on your card.  For a long time now, I've had some "wood paper" in my paper stash and I figured this would be a good time to use it, so I designed a "fence" cutting file to cut using my Cameo and it cut great.  Then I needed me some little "wood screws" for my fence, so I used my eyelet setter tool to punch some tiny pieces of cardstock, used my VersaMark and some silver embossing powder and heat set it....did this three times and while it was still hot, I pressed my tiny craft knife into it to make it look like a screw and, walla, I've got "faux" screws!!!  Then I designed a grass and flower "print and cut"  border to place in front of the fence and I used some flower soft, liquid pearls and a little Wink of Stella to dress it up.  I also want to mention that the pretty yellow flower in the grassy border is a free design by Kerri Bradford!  I used some Gina K Pure Luxury "Kraft" paper for the background, which I inked with some distress ink and the blending tool and I decided that I needed some clouds so I made a cloud "stencil" using some contact paper (contact paper is GREAT for making stencils that will adhere to your paper but not damage it and when through, you just toss it), which I designed and cut with my Cameo and then inked with a couple of colors of white ink.  I made the conversation bubble with my Cameo and for the text I used a Silhouette sketch pen.  The cute "balloon" is Recollections from Michael's!

Here are a couple of photos as well as a little video showing how he moves as I used an "Action Wobble" so he would move!  Please excuse my poor photography and video skills!


In this close-up you can see how cute my "faux" screws turned out!!!


Thank you so much for stopping by and I love reading your comments!!!


Supplies List
Papers:  Gina K "Pure Luxury Kraft", Creative Imaginations "Real Wood Thin Birch", Recollection 110 LB "White" 
Ink:  Tsukineko "VersaMark Watermark"  and Stamp-n-Stuff "Detail Silvert" embossing powder (for "faux" screws), Tim Holtz "Broken China" & "Old Paper" Distress Inks, "Unicorn" Hero Arts Shadow Ink, Brilliance Pigment "Moonlight White"
Tools:  Silhouette "Cameo", Ranger "Heat It"
Accessories:  Recollections "Balloon Sticker",  "Spring" Flower Soft, "Lemon Yellow" Liquid Pearls, "Clear" Wink of Stella, Doodlebug "White" & "Brown" Crushed Velvet Flock (for the Fox)

Thursday, May 1, 2014

A special Birthday Card for a very special Sister-In-Law!!!!

Just recently Splitcoast Stampers had a Color Challenge called "Pink Pudding", using the Stampin' Up colors "Very Vanilla", "Pink Pirouette" and "Pistachio Pudding" and I love that color combination so I decided to use that challenge to make my sister-in-law's birthday card which I gave to her today and she loves it!!!  By the way, I do not have any of that Stampin' Up cardstock, so I just went on line and found out the RGB codes and made some using my printer and white cardstock!  Also, the desert for that challenge was "No Stamping"...so I did not use the first stamp!!! So here we go....this is a "front-on" photo of it and the next one is like a side view.


And here is a close-up view.


For the ovals, I used my Spellbinders Petite Ovals SM and at  the base of the ovals I used one of my new Anna Griffin embossing folders.  The pretty flowers were cut using my Silhouette Cameo and a free flower file by "Doris the Crafter" at the UK Scrapper's site.  You can download her free flower file here at the UK Scrappers site....BUT you have to be a registered member for one month if I remember correctly!  The "greenery" was all done using Memory Box dies and the butterflies are my design that I gave away back in October and if you did not get the free file, you can go here and scroll down to go to the free download!  The tiny butterflies were from a Martha Stewart punch.....I punched them twice, the top layer was punched using pink vellum and then I used some liquid pearls on the body.  The "happy birthday" was done by me in the Silhouette software using the "Black Jack" font and then cut with my Cameo and then I used VersaMark Watermark and clear embossing powder which I heat set...did this three times!  Almost forgot to mention that I used my "Clear Wink of Stella" on the vellum butterfly wings and on some of the greenery.

Here is a photo of the inside of the card.


My DH chose the wording on the inside....and hey it is his sister...LOL  Of course, she thought it was funny!  I actually did the border for the inside using my Silhouette Studio software and scans of the images...I made that entire section a "print and cut" and then added some liquid pearls to the inside of the flowers!  The font I used is "2 Peas Mr. Giggles".

Now for the fun part............my "signature label"!  I decided to make one special for this card, so I found the image (coloring book image on Google) and colored it to match the card in Photoshop and then took it into my Studio software and made me a "print and cut"....this was so much fun and it looks so cute and original!!


And not last, but not least......I had to make a pretty box to place it in.  This was a box file that I made years ago using my Pazzles Inspiration software.  I used some craft cord around the oval and cut some pretty corners with a Cuttlebug corner die...added a bow and some bling and here it is!


For those of you that never visit the Splitcoast Stampers site, please go by and check it out.  I've found that when I do the "challenges" it inspires me to create new card designs and this one was so much fun!

Thank you so much for stopping by and I would love it if you would leave a comment about my creation.....now get busy and create something!!!


Supplies List

Papers:  Recollections "Ivory" 110 lb.,  Wausau "Bright White" 65 lb., Vellum
Ink:  Tsukineko "VersaMark Watermark" and Stamp-n-Stuff "Detail Clear Transparent" embossing powder for the sentiment
Tools:  Silhouette "Cameo",  Pazzles "Inspiration Creative Cutter", Sizzix "Big Shot", Ranger "Heat It"
Accessories:  Offray "Pink Bow", Jolee's Boutique "Dual Tone Prizm Spinel", Needloft "Craft Cord", Recollections "Pearls", "Tender Leaves", "Small Olive Branch" and foliage portion of "Fabulous Phlox"  Memory Box Dies, Spellbinders "Petite Oval SM", Cuttlebug "Corners", "Clear" Wink of Stella Brush Tip Marker, "White Opal" Liquid Pearls, Anna Griffin "Francesco Lace" embossing folder