Wednesday, May 23, 2012

Honestly, I have been busy!!!!

I just have not been posting lately.  If you do not keep up a blog, then you have no idea how time consuming it can be!  So in this post, I thought I would post photos of several projects that I have been working on.... all at one time!!!

SILK WALLPAPER COVERED FRAME

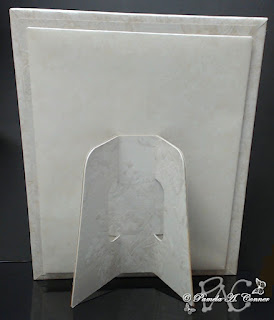
A few weeks ago I started working on a "photo frame" idea that I could make using my Cameo, some thin chipboard, poster board and some gorgeous silk wallpaper samples that my son (who is in management with Lowe's) acquired for me a while back....OMG, I just love them!!!  The inspiration for this frame came from a wooden frame that I saw online (and of course I forgot to save the link and now I can't find it) that had something like seven different layers all graduating inward to the photo...I loved the look and decided to try to create one using paper materials!  What do you think?  My husband loves this!

Front View:


View from the back:


SKETCH PROJECT

One of the other things I've been working on is playing with sketches using a Sharpie Liquid Pencil in my "HotPaws Pen Tool" for my Cameo.  All I can say is WOW!!!  If you don't have one of Sue Reynold's (HotPaws) Pen Tools you are missing out big time!!!  Check out her video!  And here is a link to her site where you can purchase one of them.  I have them for my Cameo/CraftRobo and my Pazzles Inspiration.  Here is a sketch project that I did of a wheelbarrow that was sketched by Douglas Larson at Lettering Delights.  You can find his sketches here....aren't they wonderful!!!


RECIPE BOX


Last but not least, is a Recipe Box that I made for my sister-in-law that had a birthday this past Sunday.  This box was designed by Lori Whitlock.  I absolutely love her designs and the fact that she does videos showing you, step by step, how to assemble them!  Here is a link for blog post and here is a link for her video............check them out!  Here is my finished project:

Front view of box:


Dividers


I want to add that the tiny "brown line" above the decorative border of the box top is vinyl that I cut with my Cameo and so are the "decorative edges" on each side corner of the box bottom!!!  Those "decorative vinyl edges" help add stability and strength to the box.

Thanks for stopping by for a visit.............please don't forget to leave me comments!!!  Come back soon!

Supplies (for recipe box)

Papers:  Bazzill, GA Pacific and  s e i "Desert Springs"
Tools:  Silhouette "Cameo", "HotPaws Pen Tool" for Cameo
Accessories:  Scor-Pal

Monday, May 7, 2012

I'm still "coming up roses"!!!!!!

I hope y'all don't get tired of roses.  I had to play a bit more last night, using some thinner cardstock, plus I made this one about 1.25 inches in diameter and I like it much better!  It's also easier to work with!  I used  "Plasma Blue" 80 lb. Canson "Effects Papercraft" that I bought from Michaels several years ago.  It's iridescent and I think it's some of my favorite paper that I own.  By the way, the lovely paper I placed my rose on is some Colorbok that I bought at Walmart!  At any rate, I just thought I would share this with you....so thanks for stopping by for a little visit.  Please let me know what you think of this one!


I forgot to add that the FREE cutting file for this rose is in the previous (May 4th) post, in four different formats.  Enjoy!!!

Friday, May 4, 2012

OK, let's talk about "paper flowers"!!!

Hey y'all, I know....I've not been here lately, BUT I have been very busy!  I came across a thread at the Makes the Cut Forum and that got me started on paper flowers like you would not believe!!!  Check this out:


and here is a close-up!


These are what is called "fringed flowers" in the world of quilling and Cecelia Louie designed a cutting file for those of us with digital cutters.  When I saw this, I just had to purchase it.  If you are interested, you can find it at her Etsy site here!  The file includes a really nice PDF with very good instructions and  DXF, STUDIO and SVG formats.  Thanks Cecelia!  The "plate and stand" that I used is a free fill download by Sue Lough in the UK and you can obtain it here!  I did alter the plate a bit for my project, but I love her file...thanks Sue!

OK, so now on to "My Paper Roses"!  I "googled" paper flowers looking for a really good rose file.  I found videos showing how to make them, but not a file that I really liked, so I proceeded to make my own and I'm sharing it with all of you.  When you download the file there will be a link to a video by "shabbybeautiful" that I used for my inspiration, in fact here is a link to her video!  Here are the first two roses I made using my file.


For the largest one I used Bazzill smooth white cardstock and for the smaller one (which I brushed with some yellow pigment ink in the centers with a stencil brush) I used Colorbok Textured White Cardstock from Walmart....it is a bit thinner.  I'm also going to try this with some other thinner cardstock I have in my stash and some 24 LB white paper from Epson.  Why don't you download my FREE file and give it a go....just put your own "spin" on it!!!  Just click on the file format of your choice below to download the file!


I would LOVE to hear your comments on these roses and my file! Enjoy!!!