
Just 6 days (July 21st) after my last post, we found out that we had a buyer for our house and it would be a "cash sale".....which is really good and REALLY fast! We accepted their offer and closed on August 6th!!!!! In our contract they agreed that we could stay in the house "rent free" until August 30th, but because my husband's children, granddaughter and fiance and one of our niece's and her family were helping us move, we had to do it last weekend while they were all off from work. We have moved into a little one bedroom apartment while we are dealing on a "short sale", so we put most of our belongings into storage.....including most of my craft stuff! I feel like I am going to go into "withdrawal". The only bright spot is that when we get moved into our new home, I will be creating a whole new craft room/area......that's what keeps me going!!!
After I get this apartment organized, I will be back with more details......so please don't quit stopping by!!!
Hugs!!!!!!!!!!!!!!!!! Pam


Sunday, July 15, 2012
Summertime is so busy!!!!
Hey everyone! Trust me, I am still alive and well! We have had company and we went on a camping trip, plus we've been trying to get our house sold, so I've had no time for crafting and I have to admit that I'm starting to feel withdrawal pains...LOL!
The only thing I've a had a little time to do is observe some of the beautiful wildlife of South Africa via Ustream and Africam.com. The animals are really stunning!!!
I've got to share some images of a waterbuck bull that I saw at the Djuma Waterhole via Ustream this morning. He was so handsome that I named him "George Clooney"!!! Here are three shots of him that I captured.


Isn't he absolutely gorgeous!!!!
Hopefully we have a buyer for our house and can get moved really soon so that I can get my craft room set up to start creating once more. If the deal does not go through, then I'm going to go ahead and pack up my craft room after I weed out the items I'm no longer using and redo my room and only unpack a portion of it so that when we do get the house sold I won't have so much packing to do. We want to move closer to family now that we are getting older. Plus with my husband's health issues it will be better to be closer to doctors and hospitals. It's just the moving that is a problem....God only knows that I dread it!!!
Till next time my friends!!!

The only thing I've a had a little time to do is observe some of the beautiful wildlife of South Africa via Ustream and Africam.com. The animals are really stunning!!!


Isn't he absolutely gorgeous!!!!
Hopefully we have a buyer for our house and can get moved really soon so that I can get my craft room set up to start creating once more. If the deal does not go through, then I'm going to go ahead and pack up my craft room after I weed out the items I'm no longer using and redo my room and only unpack a portion of it so that when we do get the house sold I won't have so much packing to do. We want to move closer to family now that we are getting older. Plus with my husband's health issues it will be better to be closer to doctors and hospitals. It's just the moving that is a problem....God only knows that I dread it!!!
Till next time my friends!!!
Wednesday, June 6, 2012
This one is for my friends at Africam.com!!!
I have been visiting the africam.com site for a couple of weeks now and I love seeing all the animals of South Africa. I've been going on the chat and all the nice chatters are helping me learn how to identity the animals and teaching me about them. At any rate I wanted to share this photo with them. I took it back in 2004 when I took a digital photo class and it's one of my favorites, even tho I can't stand spiders!!! I was actually trying to take a macro shot of a Black-eyed Susan, but the Green Lynx Spider was a definite bonus. Doesn't he look just like a kiwi???

Please click on the photo to see an enlargement! Thanks for stopping by and please feel free to leave comments!!!


Please click on the photo to see an enlargement! Thanks for stopping by and please feel free to leave comments!!!
Friday, June 1, 2012
Shower Card for Julie!!!
I'm going to a shower tomorrow for our great niece so I made a card to put her gift in (money..she can buy whatever she wants). She is expecting a boy and instead of "It's a boy!", I decided to use "It's gonna be a "little dude!!!". I hope she likes it!

Thanks for stopping by to visit. As always, I would love to hear your comments!

Wednesday, May 23, 2012
Honestly, I have been busy!!!!
I just have not been posting lately. If you do not keep up a blog, then you have no idea how time consuming it can be! So in this post, I thought I would post photos of several projects that I have been working on.... all at one time!!!
SILK WALLPAPER COVERED FRAME
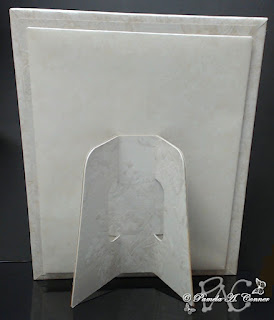
A few weeks ago I started working on a "photo frame" idea that I could make using my Cameo, some thin chipboard, poster board and some gorgeous silk wallpaper samples that my son (who is in management with Lowe's) acquired for me a while back....OMG, I just love them!!! The inspiration for this frame came from a wooden frame that I saw online (and of course I forgot to save the link and now I can't find it) that had something like seven different layers all graduating inward to the photo...I loved the look and decided to try to create one using paper materials! What do you think? My husband loves this!
Front View:

View from the back:
SKETCH PROJECT
One of the other things I've been working on is playing with sketches using a Sharpie Liquid Pencil in my "HotPaws Pen Tool" for my Cameo. All I can say is WOW!!! If you don't have one of Sue Reynold's (HotPaws) Pen Tools you are missing out big time!!! Check out her video! And here is a link to her site where you can purchase one of them. I have them for my Cameo/CraftRobo and my Pazzles Inspiration. Here is a sketch project that I did of a wheelbarrow that was sketched by Douglas Larson at Lettering Delights. You can find his sketches here....aren't they wonderful!!!

RECIPE BOX
Last but not least, is a Recipe Box that I made for my sister-in-law that had a birthday this past Sunday. This box was designed by Lori Whitlock. I absolutely love her designs and the fact that she does videos showing you, step by step, how to assemble them! Here is a link for blog post and here is a link for her video............check them out! Here is my finished project:
Front view of box:

Dividers

I want to add that the tiny "brown line" above the decorative border of the box top is vinyl that I cut with my Cameo and so are the "decorative edges" on each side corner of the box bottom!!! Those "decorative vinyl edges" help add stability and strength to the box.
Thanks for stopping by for a visit.............please don't forget to leave me comments!!! Come back soon!

SILK WALLPAPER COVERED FRAME
A few weeks ago I started working on a "photo frame" idea that I could make using my Cameo, some thin chipboard, poster board and some gorgeous silk wallpaper samples that my son (who is in management with Lowe's) acquired for me a while back....OMG, I just love them!!! The inspiration for this frame came from a wooden frame that I saw online (and of course I forgot to save the link and now I can't find it) that had something like seven different layers all graduating inward to the photo...I loved the look and decided to try to create one using paper materials! What do you think? My husband loves this!
Front View:

View from the back:

SKETCH PROJECT
One of the other things I've been working on is playing with sketches using a Sharpie Liquid Pencil in my "HotPaws Pen Tool" for my Cameo. All I can say is WOW!!! If you don't have one of Sue Reynold's (HotPaws) Pen Tools you are missing out big time!!! Check out her video! And here is a link to her site where you can purchase one of them. I have them for my Cameo/CraftRobo and my Pazzles Inspiration. Here is a sketch project that I did of a wheelbarrow that was sketched by Douglas Larson at Lettering Delights. You can find his sketches here....aren't they wonderful!!!

RECIPE BOX
Last but not least, is a Recipe Box that I made for my sister-in-law that had a birthday this past Sunday. This box was designed by Lori Whitlock. I absolutely love her designs and the fact that she does videos showing you, step by step, how to assemble them! Here is a link for blog post and here is a link for her video............check them out! Here is my finished project:
Front view of box:

Dividers

I want to add that the tiny "brown line" above the decorative border of the box top is vinyl that I cut with my Cameo and so are the "decorative edges" on each side corner of the box bottom!!! Those "decorative vinyl edges" help add stability and strength to the box.
Thanks for stopping by for a visit.............please don't forget to leave me comments!!! Come back soon!
Supplies (for recipe box)
Papers: Bazzill, GA Pacific and s e i "Desert Springs"
Tools: Silhouette "Cameo", "HotPaws Pen Tool" for Cameo
Accessories: Scor-Pal
Monday, May 7, 2012
I'm still "coming up roses"!!!!!!
I hope y'all don't get tired of roses. I had to play a bit more last night, using some thinner cardstock, plus I made this one about 1.25 inches in diameter and I like it much better! It's also easier to work with! I used "Plasma Blue" 80 lb. Canson "Effects Papercraft" that I bought from Michaels several years ago. It's iridescent and I think it's some of my favorite paper that I own. By the way, the lovely paper I placed my rose on is some Colorbok that I bought at Walmart! At any rate, I just thought I would share this with you....so thanks for stopping by for a little visit. Please let me know what you think of this one!

I forgot to add that the FREE cutting file for this rose is in the previous (May 4th) post, in four different formats. Enjoy!!!


I forgot to add that the FREE cutting file for this rose is in the previous (May 4th) post, in four different formats. Enjoy!!!
Friday, May 4, 2012
OK, let's talk about "paper flowers"!!!
Hey y'all, I know....I've not been here lately, BUT I have been very busy! I came across a thread at the Makes the Cut Forum and that got me started on paper flowers like you would not believe!!! Check this out:

and here is a close-up!

These are what is called "fringed flowers" in the world of quilling and Cecelia Louie designed a cutting file for those of us with digital cutters. When I saw this, I just had to purchase it. If you are interested, you can find it at her Etsy site here! The file includes a really nice PDF with very good instructions and DXF, STUDIO and SVG formats. Thanks Cecelia! The "plate and stand" that I used is a free fill download by Sue Lough in the UK and you can obtain it here! I did alter the plate a bit for my project, but I love her file...thanks Sue!
OK, so now on to "My Paper Roses"! I "googled" paper flowers looking for a really good rose file. I found videos showing how to make them, but not a file that I really liked, so I proceeded to make my own and I'm sharing it with all of you. When you download the file there will be a link to a video by "shabbybeautiful" that I used for my inspiration, in fact here is a link to her video! Here are the first two roses I made using my file.


For the largest one I used Bazzill smooth white cardstock and for the smaller one (which I brushed with some yellow pigment ink in the centers with a stencil brush) I used Colorbok Textured White Cardstock from Walmart....it is a bit thinner. I'm also going to try this with some other thinner cardstock I have in my stash and some 24 LB white paper from Epson. Why don't you download my FREE file and give it a go....just put your own "spin" on it!!! Just click on the file format of your choice below to download the file!


and here is a close-up!

These are what is called "fringed flowers" in the world of quilling and Cecelia Louie designed a cutting file for those of us with digital cutters. When I saw this, I just had to purchase it. If you are interested, you can find it at her Etsy site here! The file includes a really nice PDF with very good instructions and DXF, STUDIO and SVG formats. Thanks Cecelia! The "plate and stand" that I used is a free fill download by Sue Lough in the UK and you can obtain it here! I did alter the plate a bit for my project, but I love her file...thanks Sue!
OK, so now on to "My Paper Roses"! I "googled" paper flowers looking for a really good rose file. I found videos showing how to make them, but not a file that I really liked, so I proceeded to make my own and I'm sharing it with all of you. When you download the file there will be a link to a video by "shabbybeautiful" that I used for my inspiration, in fact here is a link to her video! Here are the first two roses I made using my file.


For the largest one I used Bazzill smooth white cardstock and for the smaller one (which I brushed with some yellow pigment ink in the centers with a stencil brush) I used Colorbok Textured White Cardstock from Walmart....it is a bit thinner. I'm also going to try this with some other thinner cardstock I have in my stash and some 24 LB white paper from Epson. Why don't you download my FREE file and give it a go....just put your own "spin" on it!!! Just click on the file format of your choice below to download the file!
I would LOVE to hear your comments on these roses and my file! Enjoy!!!
Subscribe to:
Posts (Atom)
This is "Miss Dani"

Just a bit about me...........

- Pam
- North FL
- Welcome to my little corner of the web! I'm so glad you stopped by for a visit. My name is Pam and I'm afraid that I have an incurable addiction.…it is paper crafting! Even though I’m addicted, I believe my craft is what keeps me going…I absolutely enjoy what I do!!! I'm a wife, a mother (two sons, one stepson and two stepdaughters, all grown), grandmother (three step granddaughters, one step grandson, all grown and two little grandsons, 10 and 7 yrs. old) and step Great-grandmother to six (three boys & three girls). Now one more important element in our family, is our adorable little Yorkie, Miss Dani......thus my alias of "YorkieMom". Thanks for dropping by….. enjoy your visit and by all means, please visit often!


Popular Posts
-
 Hey y'all, I know....I've not been here lately, BUT I have been very busy! I came across a thread at the Makes the Cut Forum and th...
 -
 Y'all, I am so excited! I received my Silhouette Cameo on Friday evening.....UPS always delivers out here last thing! Everything was i...
 -
 for everyone that leaves a comment below! While I was in rehab after my open heart surgery for an aortic aneurysm, I had the nicest "...
 -
 and decided I would keep posting my test cuts here at my blog so that I can direct those that ask me what I'm able with it can see for t...
 -
 Just recently Splitcoast Stampers had a Color Challenge called "Pink Pudding", using the Stampin' Up colors "Very Vanilla...
 -
 Well, not me! Had you going there for a minute, didn’t I? Seriously, my husband’s great niece is getting married on March 12th and I just fo...
 -
 During the past couple of years I have become very close friends with a very special lady named Tina (aka/silverst170)at the UK Scrappers s...
 -
 Isn't this little turkey the most adorable thing you've seen in ages?!!!! As you all know I have, and love, a Pazzles "Inspir...
 -
 Just recently my sister-in-law (the one that lost her husband and almost her own life in a horrible auto accident last year) asked me if I w...
 -
 My good friend Sue (better known in the crafting world as "HotPaws") celebrated her birthday last week and just happened to be at ...
Blogs That I Frequent


