Thursday, December 30, 2010

Wonderful Gift Box!!!!!!

I found the idea for this gift box here and if you check out her entire blog, Elly does some absolutely beautiful work!!!  I set about making a cutting file for this project so that my Pazzles Inspiration Creative Cutter would do all of the cutting for me, which is always nice!  The only thing that was not done using my PI was the Spellbinders Labels Two and the Martha Stewart "Eyelet Lace" punched border.  The "dahlia" flower is from a template I purchased from "Fred She Said" (you can find it here) and I even set it up for my PI to cut all of them out for me!  Something else that I want to point out is that I've used some silk wallcovering samples from Lowe's in the making of this box and............I LOVE it!!!

Here is a photo of the top of the box:


Here is a photo of the box opened up.....as an extra security I used some brads to attach the box tray to the card section:


And last but not least, here is a close-up photo of the flower I made:


I used this gift box to hold a Christmas gift.  Thanks Elly for the marvelous idea!!!


Supplies


Paper:  Bazzill "Mystique", Strathmore "Parchment" and "Silk Encyclopedia (silk wallcovering samples from Lowe's)
Ink:  Tim Holtz "Old Paper" Distress Ink
Tools:  Pazzles "Inspiration Creative Cutter" and Provo Craft "Cuttlebug"
Accessories:  Spellbinders "Lables Two", Spare Parts "Brads"

Saturday, November 20, 2010

Turkey Centerpiece!!!


Isn't this little turkey the most adorable thing you've seen in ages?!!!!  As you all know I have, and love, a Pazzles "Inspiration Creative Cutter" and that's what I used to make this project.  Klo Oxford has free Pazzles classes live and online on Sunday evening and Tuesday afternoons and this past Sunday this was what she covered in our class.  If you are a member of the Pazzles Craft Room this project is a FREE download.  At her class she got permission from Pazzles to give all of us that attended the class all the files for this project free, rather we were a member or not!

This year we will be having Thanksgiving dinner at our middle granddaughter's (she's almost 26) house and I made this to use as the centerpiece as there will be a number of young children there and I know they will enjoy it!  I hope each and every one of you have a wonderful Thanksgiving celebration!!!
Supplies


Paper:  Bazzill and Core'dinations
Ink:  Color Box Fluid Chalk "Chestnut Roan"
Tools:  Pazzles "Inspiration Creative Cutter"
Accessories:  Crystal Lacquer

Monday, November 8, 2010

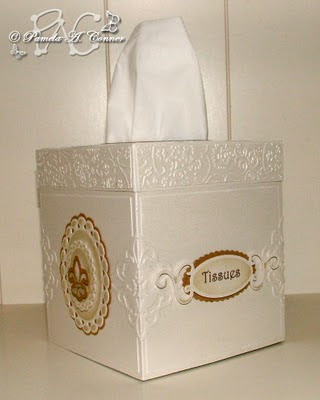
Just one more tissue box cover..........................

and this time I made one for me!!!  For those of you that would like to make some of these, you can find a written tutorial as well as a wonderful video here!

Here is a view of the top of the cover:


And here is a view of two of the sides:


And last but not least the other two sides:


I do believe this is all of the tissue box covers that I will be making for a while!LOL Thanks so much for stopping by to have a look.........and hurry back!!!  Hopefully I will have a new card design soon!

Supplies


Paper:  Bazzill and Bazzill Bling
Ink:  Tim Holtz "Old Paper" Distress Ink and Tsukineko Brilliance "Platinum Planet"
Tools:  Pazzles "Inspiration Creative Cutter", Provo Craft "Cuttlebug", Sizzix "Big Shot"
Accessories:  Provo Craft Cuttlebug "Textile" Embossing Folder and Spellbinders "Beaded Ovals", Shapeabilities "Fancy Tags" and "Symbology, Shapabilities Pendants "Fleur De Lis" and Nestabilities "Long Rectangles and Long Scalloped  Rectangles SM"

Friday, October 29, 2010

I've been making "Tissue Box Covers"!!!!

Hello everyone!!!  Every Wednesday Splitcoast Stampers sends me the "SCS Weekly Inkling" and last Wednesday the tutorial in it was for a "Tissue Box Cover" (#232) and I decided to make several of them because I loved the idea!

The 1st one I made has a Tuscan flair and I made it for my SIL, Merrylene.  Here are three views of it:


Just recently I had purchased some Tim Holtz "Grunge Paper" from Michaels and I decided to use some of it in my design for this box.  I used it for the "Lotus Pendant" and for the trim around the box lid...I inked it with some Distress Ink and I now LOVE grunge paper!!!

Supplies


Paper:  The Paper Studio, Tim Holtz "Grunge Paper" and some CS that I bought from Wally World years ago!
Ink:  Tim Holtz "Tea Dye" Distress Ink
Tools:  Pazzles "Inspiration Creative Cutter", Provo Craft "Cuttlebug"
Accessories:  Provo Craft "Script" & "Frills Set" and Sizzix "Textured Impressions Finial Press" Embossing Folders, Spellbinders "Labels Four", "Fancy Tags" and Shapeabilities "Lotus Pendant"

I then decided to make an FSU tissue box cover and my DH....he is a staunch down fan and he LOVED it.  Here are a couple of views of it:


For his, I used some K&Company "Collegiate" stickers that I've had in my stash for ages.  I used a Cuttlebug "Tiny Bubbles" embossing folder and some Tim Holtz "Black Soot" Distress Ink to make the lid look like a football!  Papers used for this one as Bazzill and some that CS that I bought from Wally World years ago!

The next one I made is for my other SIL, Lillian and she wanted hers to be peach and green.  Here are three different views of it:


My youngest son acquired some wall paper sample books for me some time back and for this cover I decided to use a plaid and a floral wallpaper sample in it!

Supplies


Paper:  Bazzill "Palo Verde" & "Peach Glow"
Ink:  Tsukineko "VerseMark Watermark Stamp Pad"
Tools:  Pazzles "Inspiration Creative Cutter", Provo Craft "Cuttlebug"
Accessories:  Provo Craft "Just My Type Set" Embossing Folder, Spellbinders "Labels Two", "Fancy Tags", Shapeabilities "Classic Frame" and "Nestabilities LG Classic Ovals, Provo Craft Cuttlebug "Vintage" die

Thanks for stopping by to visit and I just want to add that I made a cutting file from the SCS tutorial for my Pazzles "Inspiration Creative Cutter" and all of my panels, plus the base and lid were cut using my Pazzles...don't know what I would do without it!!!

Sunday, September 5, 2010

Hey there.....check out my nifty toolbox!!!!!

Hello everyone!!! I finally got some time for crafting this week. Unfortunately, we've had a lot going on with our family. We found out on August 12th that my husband's middle child (Janice is 46) has lung cancer. She is now taking chemo once a week and radiation everyday during the week with the weekends off. Please be sure and keep Janice in your prayers! Also during this time my youngest son (Chad..age 36) had a really bad intestinal infection and lost a lot weight. He had cancer (Wilms Tumor) when he was 3 1/2 years old............so this really scared me. He is better now...thank God!

This past Sunday, I attended one of Klo Oxford's online classes for the Pazzles Inspiration Creative Cutter (last year I served on their design team) and she presented a toolbox template designed by Wendy @ Poppy Hill Designs (you can find her here). Wendy was kind enough to give those of us that attended the class the cutter files for it...thanks Wendy! Here is what I came up with....my craft room is mostly black, white and grey:


And here is a photo of inside. I added some strips of self adhesive magnetic tape to add weight and stability. For the handle on top, I used another one of the Spellbinders "Fancy Tags". Thanks for looking.....I just love my little toolbox!!!


Thanks for stopping by!
Supplies

Paper: DCWV "the Dressed Up stack"
Tools: Pazzles Inspiration Creative Cutter, Big Shot
Accessories: Spellbinders Shapabilities "Fancy Tags"

Sunday, July 4, 2010

I know, I've been scarce lately....................

and the only excuse that I have is that I've been staying totally busy spending a lot of time with my DH. We're both retired and love to play cards and we also recently purchased a Wii and we enjoy the bowling and playing golf. I bought the Wii Fit too, but I've not been using it like I should. In the past few years I've spent lots of time in my craft room and very little with my husband......I need to hit a happy medium!!!LOL Note: Ok, it's several days later (today is actually July 13th) and Teri has received her card and it's OK for me to post this now!LOL

This is a birthday card that I just completed for one of my wonderful cyber friends and even though I'm posting this now, I will not be able to show it here on my blog until she receives it! I totally fell in love with and cased this card that I saw at Splitcoast Stampers recently. I used the same Anna Griffin DP and the same Martha Stewart border punch, but changed the ribbon treatment and stamps.


I custom designed and cut the envelope for it using my Pazzles Inspiration software and cutting machine and included a liner using the same Anna Griffin DP. One thing I do want to add here is that if you haven't tried "Scor-Tape", you don't know what you're missing....that stuff is wonderful!!!!

Finished Card Size: 5 1/2"x5 1/2"

Papers: Anna Griffin, Bazzill and Gina K. "Pure Luxury"
Stamps: Studio G
Ink: Tsukineko Memento "Rich Cocoa"
Tools: Pazzles Inspiration Creative Cutter" and Bow Easy
Accessories: want2scrap "Say it with Pearls", Martha Stewart "Doily Lace" Border Punch, May Arts "100% Silk Ribbon, Scor-Tape

Friday, May 28, 2010

50th Wedding Anniversary Card..............

Just recently my sister-in-law (the one that lost her husband and almost her own life in a horrible auto accident last year) asked me if I would make a 50th anniversary card for some dear friends of hers and of course I said that I would be happy to! The wife used to be a client of mine and is a friend also. I got to thinking of the Splitcoast Featured Stamper Challenge for the week of May 15th when Cathleen (aka/ctorina) was the featured stamper and back in April she had made a card that I thought was absolutely stunning...but then I think all of her work is stunning!!! You can see the card I'm referring to here and I decided to use it for my inspiration. When you case a card of a "featured stamper" you are to change at least 2 or more things on it and I changed a lot more than 2 and one of the ones that I changed was the "orientation". Here is a photo of the front of the card that I made:

And here is a photo of the back of the card I made:

Here is a close-up of the flower that I made using a cutting file designed and sold by Laurne Meader (here is a link to her blog where she has a wonderful video showing how to create them and here is a link to her online store where you can purchase the cutting file and it's only $2.50 (so worth it!). She has a lot more really nice cutting files!!!)

Here is a photo of the inside top of the card where I included the photo that was on their invitation to make this card even more of a keepsake!

And here is a photo of the verse that I used on the inside bottom of the card:

I guess that you can tell that this card will not fit into a regular A7 envelope...so I decided to design an "A7 Card Box" that I can cut using my Pazzles Inspiration Creative Cutter! Here is a photo of the front of the box I designed:

And here is a photo of a side view of the box:

Finished Card Size: A7/5"x7"
Supplies

Papers: Neenah, Recollections (black), Black Suede Gold Mirror Cardstock and "Sparkling Papers" by WorldWin
Tools: Pazzles Inspiration Creative Cutter, QuicKutz Revolution, Provo Craft Cuttlebug
Accessories: Spellbinders (LG Classic Ovals, LG Classic Ovals Scalloped, SM Standard Circles and Labels Two), Martha Stewart Punch Around the Page "Double Loops" (border for box sides) and "Floral Vine" & "Garden Trellis" Deep Edge Punches, Peel-Off Stickers, Want2scrap "Black Half Pears", Mark Richards "Gold Half Pearls", "Gold" Stickles

Friday, March 19, 2010

I guess you can say that I "fabricated" this one!!!


This is my card for this week's Splitcoast Stampers "Sketch Challenge" (SC272) and if you want to play too you can find all the pertinent info here! The reason I said "fabricated" is that I used some beautiful fabric that I found at a new quilting store in my area on Tuesday....naturally I could not resist buying a piece of it!!! I adhered it to a piece of cereal box that I cut using my Pazzles Inspiration Creative Cutter and then ran through my Xyron machine. The absolutely gorgeous 100% silk ribbon that I used came from Sharon Johnson at "No Time to Stamp" and if you would like to purchase some from her, you can find it here. I hate to admit it, but I bought my first order from her about a year ago and I've been hording it and I just ordered some more from her a couple of weeks ago and I'm going to start using it more often. It's so great to work with and it looks stunning!!!! For the "medallion" I used a corner punch by Martha Stewart and Becca's (Amazing Paper Grace) technique.

Now, to the butterfly and you can get a better, larger view of it by clicking on my photo above. A dear friend of mine sent me this birthday card for my birthday in 2008 with some beautiful butterflies on it that were from a stamp set she has. I used them as a model for one I designed to cut and emboss using my Pazzles Inspiration and the Pen Tool that Sue Reynolds, aka/HotPaws designed that will hold many different sizes of pens. I cut two layers and used fun foam to "elevate" the wing tips. Thanks for looking and have a great weekend!!!
Finished Card Size: A2/5.5"x4.25"

Supplies

Papers: "Kiwi Iridescent" Effects Papercraft by Canson (butterfly), Darice Paper Crafter, "The Chocolate Box" by Core'dinations, Bazzill
Stamps: "Spring Blossoms Clear Stamp Set" by Inkadinkado (flower and sentiment)
Inks: ColorBox
Tools: Pazzles "Inspiration Creative Cutter", QuicKutz "Revoltion", Range "Heat It"
Accessories: Ranger "Super Fine Detail Gold" Embossing Powder, "Bow Easy", 100% Silk Ribbon, Spellbinders Nestabilities, Martha Stewart "Loops" Corner Punch, "Say it with Bling" and "Say it with Pearls" by want2scrap, Copic Spica "Pink", Beifa Gel Pens

Monday, February 8, 2010

Splitcoast's "Featured Stamper" Challenge


Barbara Anders (aka "Bar") was the "Featured Stamper" at the Splitcoast "Featured Stamper Challenge" (FS157 - Raise the Bar!) yesterday and I chose this card from her gallery! You can also check out her blog and leave her a comment for some blog candy here. I thought her card was so lovely and could not believe that it only received 2 comments! For the challenge we are supposed to change a least two things..... I changed many more but stuck with card layout that she used. If anyone would be interested in taking on this challenge, you can find it here!

The flowers that I used are some that I bought from Michaels and the leaves I used with them are some that I cut and paper sculpted years ago for a quilling project. I paper sculpted the flowers too and then added a couple of colors to the centers for some contrast.

Thanks for stopping by for a visit!
Finished Card Size: A7/5"x7"
Supplies

Papers: My Mind's Eye "Wild Asparagus" (patterned papers), Bazzill
Stamps: Hampton Art "Studio G" (sentiment), Flora & Fauna by KaiserCraft, CC Ruben Stamps, Judith
Ink: "Pearlescent Ivy" and "Victorian Violet" Brilliance Pigment (sentiment), Memento "New Sprout"
Tools: Pazzles "Inspiration Creative Cutter"
Accesories: Recollections "Pearl Stickers", Offray Ribbon, "Brides" Flowers from Michaels, Martha Stewart "Eyelet Lace" Border Punch, "Olive Green" (#15) and "Eggplant" (#107) Marvy LePlume II Markers

Saturday, February 6, 2010

And I'm back, yet again!...............


Well, as you can tell by my lack of activity here at my blog, I've been in a bit of a creative slump and I have to thank a very nice lady by the name of Velta for encouraging me to get back to work! The other day, I had stopped by her blog as I do frequently and I was so impressed by a card she had just posted (you can see it here at her blog) that I left her the following comment:

"Oh Velta, this is so beautiful!!!! I've kind of been going through a creative slump lately and this is just the inspiration I need to snap out of it...thank you!!!"

Well, she visited here at my blog and left the following comment:

"Oh MY Pam ~ I have been through your blog and your talent is amazing. All of your creations are so elegant...just what I like! Thank you for stopping by and commenting on my blog! It is hard for me to understand (other than the holidays) with your talent how you could be in a slump...Get on out here girl and get to work...I want to see more of your art!!!"

After reading her comment, I happened across a link to the Flourishes Newsletter and the first item I saw was "What's Your Cup of Tea? Challenge!" Well, to be honest I found that interesting and decided to take the challenge and make a Valentine card for my husband. My morning beverage is "Starbucks Breakfast Blend" and I went from there. Now, mind you this is not the best card I've ever designed, but my DH does not like "fluffy, girly" stuff, so I tried to keep it simple. Here is a photo showing the Starbucks bag along side of the card I designed:

and here is a close-up of the digitally stamped image I used:

This adorable little snail was a freebie from doodlepalace.com. I actually altered the image by cutting of the tail, changing the envelope sentiment, replacing the antennae with wire ones and adding the eyelashes. I colored the image using markers by Neopiko.

I also want to point out that the paper piercing that I did on this card (the sun rays) was done using my new "Piercing Tool" for the Pazzles "Inspiration Creative Cutter". The needle that I used in it was not quite large enough, so I used a manual piercing tool to make the piercings larger....I need to go to Hobby Lobby and purchase a larger sewing machine needle!

Thank you so much Velta for giving me the "boost" that I needed!!!

Thanks so much for stopping by!!!
Finished Card Size: 5.5"x5.5"
Supplies

Paper: Core'dinations, Daisyd's "Playtime Dots - Pink & Yellow #14061" (hearts border)
Stamps: "Snail Mail" digital freebie from Doodle Palace and Studio G
Ink: Memento "Rich Coccoa"
Tools: Pazzles "Inspiration Creative Cutter", QuicKutz "Revolution"
Accessories: Spellbinders "Nestabilities", Neopiko Markers, Ranger "Diamond" Stickles, Martha Stewart "Lace Heart" Edge Punch, Recollections "Pearl Stickers"