Showing posts with label Boxes. Show all posts

Thursday, May 1, 2014

A special Birthday Card for a very special Sister-In-Law!!!!

Just recently Splitcoast Stampers had a Color Challenge called "Pink Pudding", using the Stampin' Up colors "Very Vanilla", "Pink Pirouette" and "Pistachio Pudding" and I love that color combination so I decided to use that challenge to make my sister-in-law's birthday card which I gave to her today and she loves it!!!  By the way, I do not have any of that Stampin' Up cardstock, so I just went on line and found out the RGB codes and made some using my printer and white cardstock!  Also, the desert for that challenge was "No Stamping"...so I did not use the first stamp!!! So here we go....this is a "front-on" photo of it and the next one is like a side view.


And here is a close-up view.


For the ovals, I used my Spellbinders Petite Ovals SM and at  the base of the ovals I used one of my new Anna Griffin embossing folders.  The pretty flowers were cut using my Silhouette Cameo and a free flower file by "Doris the Crafter" at the UK Scrapper's site.  You can download her free flower file here at the UK Scrappers site....BUT you have to be a registered member for one month if I remember correctly!  The "greenery" was all done using Memory Box dies and the butterflies are my design that I gave away back in October and if you did not get the free file, you can go here and scroll down to go to the free download!  The tiny butterflies were from a Martha Stewart punch.....I punched them twice, the top layer was punched using pink vellum and then I used some liquid pearls on the body.  The "happy birthday" was done by me in the Silhouette software using the "Black Jack" font and then cut with my Cameo and then I used VersaMark Watermark and clear embossing powder which I heat set...did this three times!  Almost forgot to mention that I used my "Clear Wink of Stella" on the vellum butterfly wings and on some of the greenery.

Here is a photo of the inside of the card.


My DH chose the wording on the inside....and hey it is his sister...LOL  Of course, she thought it was funny!  I actually did the border for the inside using my Silhouette Studio software and scans of the images...I made that entire section a "print and cut" and then added some liquid pearls to the inside of the flowers!  The font I used is "2 Peas Mr. Giggles".

Now for the fun part............my "signature label"!  I decided to make one special for this card, so I found the image (coloring book image on Google) and colored it to match the card in Photoshop and then took it into my Studio software and made me a "print and cut"....this was so much fun and it looks so cute and original!!


And not last, but not least......I had to make a pretty box to place it in.  This was a box file that I made years ago using my Pazzles Inspiration software.  I used some craft cord around the oval and cut some pretty corners with a Cuttlebug corner die...added a bow and some bling and here it is!


For those of you that never visit the Splitcoast Stampers site, please go by and check it out.  I've found that when I do the "challenges" it inspires me to create new card designs and this one was so much fun!

Thank you so much for stopping by and I would love it if you would leave a comment about my creation.....now get busy and create something!!!


Supplies List

Papers:  Recollections "Ivory" 110 lb.,  Wausau "Bright White" 65 lb., Vellum
Ink:  Tsukineko "VersaMark Watermark" and Stamp-n-Stuff "Detail Clear Transparent" embossing powder for the sentiment
Tools:  Silhouette "Cameo",  Pazzles "Inspiration Creative Cutter", Sizzix "Big Shot", Ranger "Heat It"
Accessories:  Offray "Pink Bow", Jolee's Boutique "Dual Tone Prizm Spinel", Needloft "Craft Cord", Recollections "Pearls", "Tender Leaves", "Small Olive Branch" and foliage portion of "Fabulous Phlox"  Memory Box Dies, Spellbinders "Petite Oval SM", Cuttlebug "Corners", "Clear" Wink of Stella Brush Tip Marker, "White Opal" Liquid Pearls, Anna Griffin "Francesco Lace" embossing folder

Saturday, February 15, 2014

I consider this one my "masterpiece"!!!

For a while now, I've been working on a a 50th birthday card for my youngest stepdaughter who has been battling cancer for several years now and I wanted it to be VERY special....just as she is!!! This is what I've came up with and she loves it!


Here is a close-up of the "50", which was done using the "CentSchbook BT" font.  For the "looks good", I used the "CAC Lasko Even Weight" font and for "on you!" I used the "KG Second Chance" font and a Silhouette "Silver" sketch pen and all of these fonts can be downloaded for free online....just "google" them!  The flowers I used are from the Bridal Dept. at Michael's...I just used a flower sculpting tool to shape them, then enhanced them with a "Silver" Wink of Stella and added pearls to the centers.  I also used my Anna Griffin "Poppy" embossing folder, some Spellbinders Nestabilities and my Martha Stewart "Rose Leaf" and "Branch" punches that I brushed with my "Clear" Wink of Stella Brush Tip Marker.


I made this card into a pop-up and here is a photo of the inside.For the label at the top that says "so, kick up....", I used one of the labels from the "Labels Set of 4" which is a freebie cutting file from Bird's Cards...if you've never been to her site, you really need to go check it out!!!  The font I used is the "KG Second Chance".  For the "HAPPY 50th BIRTHDAY JANICE!", I used some parts from  a Silhouette file called "Happy Birthday Bunting" by Jennifer Wambach [Design ID #15364] and the "Calibri" font.  Now that one was a job as I used silver thread to "hang" the banners...but Janice is so worth it!  Now, for the absolutely adorable shoes and bag, I used another Silhouette file. "Shoe and Purse" by Sarah Bailey [Design ID #8799] which I cut out of Hot Off the Press suede papers and some silver mirror paper for the top of the purse!


Here is a close-up of the shoes and purse.


I always put a "signature label" on the back of my cards and personally sign them and I used another Silhouette file called "Decorative Artisan" by Snapdragon Snippets [Design ID #16056] to make that personal label that I signed.  I used the "Alex Brush" font on it.   Here is a photo of it.


And now, last but not least, here is a photo of the box that I made to house the card as it was way too thick for an envelope.  I used an old Cuttlebug corner die to cut some corners and I cut an oval on my Cameo and embossed it with my "Poppy" embossing folder to go around the oval on the front.  I just used a piece of acetate for the oval window.


This card was a lot of work but also a lot of fun to make and our Janice is well worth it!  Please keep her in your prayers.  Thanks for stopping by!!!

Finished Card Size:  A7 (5"x7")


Supplies List

Papers:  Recollections "Ivory" 110 lb., DCWV "Glitter Papers",  Hot Off the Press "Smoke Suede" & "Black Suede", My Mind's Eye "Wild Asparagus" blue/brown stripe #WA2020
Tools:  Silhouette "Cameo", Spellbinders "Grand Calibur"
Accessories:  Gardner "Brides Flowers", Recollections "Pearls", "Silver" & "Clear" Wink of Stella Brush Tip Markers, Spellbinders Nestabilities "Petite Ovals LG", Martha Stewart "Rose Leaf" & "Branch" punches, Anna Griffin "Poppy" embossing folder

Wednesday, May 23, 2012

Honestly, I have been busy!!!!

I just have not been posting lately.  If you do not keep up a blog, then you have no idea how time consuming it can be!  So in this post, I thought I would post photos of several projects that I have been working on.... all at one time!!!

SILK WALLPAPER COVERED FRAME

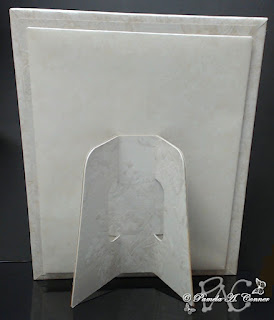
A few weeks ago I started working on a "photo frame" idea that I could make using my Cameo, some thin chipboard, poster board and some gorgeous silk wallpaper samples that my son (who is in management with Lowe's) acquired for me a while back....OMG, I just love them!!!  The inspiration for this frame came from a wooden frame that I saw online (and of course I forgot to save the link and now I can't find it) that had something like seven different layers all graduating inward to the photo...I loved the look and decided to try to create one using paper materials!  What do you think?  My husband loves this!

Front View:


View from the back:


SKETCH PROJECT

One of the other things I've been working on is playing with sketches using a Sharpie Liquid Pencil in my "HotPaws Pen Tool" for my Cameo.  All I can say is WOW!!!  If you don't have one of Sue Reynold's (HotPaws) Pen Tools you are missing out big time!!!  Check out her video!  And here is a link to her site where you can purchase one of them.  I have them for my Cameo/CraftRobo and my Pazzles Inspiration.  Here is a sketch project that I did of a wheelbarrow that was sketched by Douglas Larson at Lettering Delights.  You can find his sketches here....aren't they wonderful!!!


RECIPE BOX


Last but not least, is a Recipe Box that I made for my sister-in-law that had a birthday this past Sunday.  This box was designed by Lori Whitlock.  I absolutely love her designs and the fact that she does videos showing you, step by step, how to assemble them!  Here is a link for blog post and here is a link for her video............check them out!  Here is my finished project:

Front view of box:


Dividers


I want to add that the tiny "brown line" above the decorative border of the box top is vinyl that I cut with my Cameo and so are the "decorative edges" on each side corner of the box bottom!!!  Those "decorative vinyl edges" help add stability and strength to the box.

Thanks for stopping by for a visit.............please don't forget to leave me comments!!!  Come back soon!

Supplies (for recipe box)

Papers:  Bazzill, GA Pacific and  s e i "Desert Springs"
Tools:  Silhouette "Cameo", "HotPaws Pen Tool" for Cameo
Accessories:  Scor-Pal

Thursday, December 30, 2010

Wonderful Gift Box!!!!!!

I found the idea for this gift box here and if you check out her entire blog, Elly does some absolutely beautiful work!!!  I set about making a cutting file for this project so that my Pazzles Inspiration Creative Cutter would do all of the cutting for me, which is always nice!  The only thing that was not done using my PI was the Spellbinders Labels Two and the Martha Stewart "Eyelet Lace" punched border.  The "dahlia" flower is from a template I purchased from "Fred She Said" (you can find it here) and I even set it up for my PI to cut all of them out for me!  Something else that I want to point out is that I've used some silk wallcovering samples from Lowe's in the making of this box and............I LOVE it!!!

Here is a photo of the top of the box:


Here is a photo of the box opened up.....as an extra security I used some brads to attach the box tray to the card section:


And last but not least, here is a close-up photo of the flower I made:


I used this gift box to hold a Christmas gift.  Thanks Elly for the marvelous idea!!!


Supplies


Paper:  Bazzill "Mystique", Strathmore "Parchment" and "Silk Encyclopedia (silk wallcovering samples from Lowe's)
Ink:  Tim Holtz "Old Paper" Distress Ink
Tools:  Pazzles "Inspiration Creative Cutter" and Provo Craft "Cuttlebug"
Accessories:  Spellbinders "Lables Two", Spare Parts "Brads"

Saturday, November 20, 2010

Turkey Centerpiece!!!


Isn't this little turkey the most adorable thing you've seen in ages?!!!!  As you all know I have, and love, a Pazzles "Inspiration Creative Cutter" and that's what I used to make this project.  Klo Oxford has free Pazzles classes live and online on Sunday evening and Tuesday afternoons and this past Sunday this was what she covered in our class.  If you are a member of the Pazzles Craft Room this project is a FREE download.  At her class she got permission from Pazzles to give all of us that attended the class all the files for this project free, rather we were a member or not!

This year we will be having Thanksgiving dinner at our middle granddaughter's (she's almost 26) house and I made this to use as the centerpiece as there will be a number of young children there and I know they will enjoy it!  I hope each and every one of you have a wonderful Thanksgiving celebration!!!
Supplies


Paper:  Bazzill and Core'dinations
Ink:  Color Box Fluid Chalk "Chestnut Roan"
Tools:  Pazzles "Inspiration Creative Cutter"
Accessories:  Crystal Lacquer

Monday, November 8, 2010

Just one more tissue box cover..........................

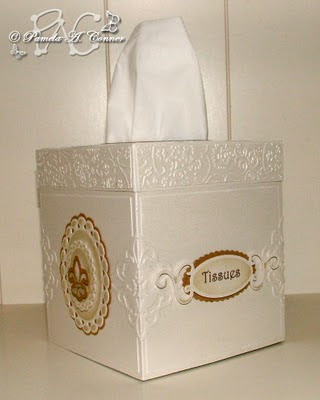
and this time I made one for me!!!  For those of you that would like to make some of these, you can find a written tutorial as well as a wonderful video here!

Here is a view of the top of the cover:


And here is a view of two of the sides:


And last but not least the other two sides:


I do believe this is all of the tissue box covers that I will be making for a while!LOL Thanks so much for stopping by to have a look.........and hurry back!!!  Hopefully I will have a new card design soon!

Supplies


Paper:  Bazzill and Bazzill Bling
Ink:  Tim Holtz "Old Paper" Distress Ink and Tsukineko Brilliance "Platinum Planet"
Tools:  Pazzles "Inspiration Creative Cutter", Provo Craft "Cuttlebug", Sizzix "Big Shot"
Accessories:  Provo Craft Cuttlebug "Textile" Embossing Folder and Spellbinders "Beaded Ovals", Shapeabilities "Fancy Tags" and "Symbology, Shapabilities Pendants "Fleur De Lis" and Nestabilities "Long Rectangles and Long Scalloped  Rectangles SM"

Sunday, September 5, 2010

Hey there.....check out my nifty toolbox!!!!!

Hello everyone!!! I finally got some time for crafting this week. Unfortunately, we've had a lot going on with our family. We found out on August 12th that my husband's middle child (Janice is 46) has lung cancer. She is now taking chemo once a week and radiation everyday during the week with the weekends off. Please be sure and keep Janice in your prayers! Also during this time my youngest son (Chad..age 36) had a really bad intestinal infection and lost a lot weight. He had cancer (Wilms Tumor) when he was 3 1/2 years old............so this really scared me. He is better now...thank God!

This past Sunday, I attended one of Klo Oxford's online classes for the Pazzles Inspiration Creative Cutter (last year I served on their design team) and she presented a toolbox template designed by Wendy @ Poppy Hill Designs (you can find her here). Wendy was kind enough to give those of us that attended the class the cutter files for it...thanks Wendy! Here is what I came up with....my craft room is mostly black, white and grey:


And here is a photo of inside. I added some strips of self adhesive magnetic tape to add weight and stability. For the handle on top, I used another one of the Spellbinders "Fancy Tags". Thanks for looking.....I just love my little toolbox!!!


Thanks for stopping by!
Supplies

Paper: DCWV "the Dressed Up stack"
Tools: Pazzles Inspiration Creative Cutter, Big Shot
Accessories: Spellbinders Shapabilities "Fancy Tags"

Sunday, July 12, 2009

Here's the Stationery Box that I made for Merrylene.....


back in May for her birthday. I got all my ideas for this project here! This next photo shows the box opened up. As you can see, I made a few changes, such adding an Address Book, a Note Pad and some Mailing Labels. I also glued the inner flap and added a decorative border.


Here are closeups of the Address Book and the inner pages of it and the Note Pad. I designed the inner pages using Photoshop and then did a "Print and Cut" using my Pazzles "Inspiration Creative Cutter".


And here are close-up photos of the six cards that I included with the box.


This project was fun, but it was also a lot of work, but it was worth it to be able to give it to Merrylene as a gift. By the way, she loved it!!!


Supplies

Papers: Bazzill and "Wild Asparagus" (all of the designer papers) by My Mind's Eye
Stamps: Anna Griffin "Flourishes Set 3" and Martha Stewart "Monogram and Frame Stamps"
Ink: "VersaMark Watermark" by Tsukiniko
Embossing Powder: Stamp-n-Stuff "Detail Clear Transparent"
Tools: Pazzles "Inspiration Creative Cutter", Zutter "Bind-It-All", Provo Craft "Cuttlebug", and "Scor-Pal"
Accessories: Fiskars "Sunburst" Border Punch, Ranger "Liquid Pearls", Tim Holtz "Distress Inks", Mark Richards "Crystal Stickers Pearls", Offray Ribbons, Spellbinders "Nestabilities", The Robbins Nest "Clear Dew Drops" (I colored them brown using Bic Marker), Bride's Flowers by Gartner Studios (purchased at Michael's and altered by me using a tiny paint brush and water color pencils)

Monday, December 29, 2008

I used the same pattern/design file that I designed in my Pazzles software for this one too! This is the one I’ve made for the sweet lady that comes to my house every other Wednesday and transforms it! Her name is Sharon and I also call her “my angel” and I guess I could also call her my “domestic engineer”! At any rate, she and I did not do Christmas yet as she was here last about eight days before Christmas and we decided we would do it on the Wednesday after Christmas, which is also New Year’s Eve! I have included front and back views in the photos below.


One thing that I did different this time, is that I used some suede paper for the trim, as well as the embellishments. I also used a 1 inch mirror square for the clasp and I used the “engraving tool” on my Pazzles Inspiration to engrave Sharon’s initials on the piece of mirror, which really gives it a personal touch!!! The template/pattern, all trim, reindeer and flourishes were cut using my Pazzles Inspiration.
Supplies

Papers: Bazzill, Suede Paper
Ink: Tsukineko “VersaMark Watermark”
Stamps: Anna Griffin "Flourishes"
Embossing Powder: “PearlLuster Emerald” by Stamp-n-Stuff
Tools: Pazzles InspirationAccessories: Darice Mirror Tiles, Antique Metal Corners by Spare Parts

Sunday, December 21, 2008

Y'all I'm so excited......................

I know you’ve heard me mention my “adopted daughter” before, but for those who haven’t, here’s the story. Five years ago one of my dearest friends, Pat, died of ovarian cancer and prior to her death she told me that Cathy, her youngest child of four grown children would really need me and more or less asked me to be there for her. Well, after Pat’s death, I guess you could say that Cathy and I adopted each other!!! She even calls me “Pomma”, which is a mix of Pam and Momma. At any rate, I love her dearly and I made this purse/box to hold her Christmas present this year. I actually made this on Friday night and finished it off today with the “dear tag”. I've included a front & side view, as well as a view from the back.


I totally designed the pattern in my new Funtime 2009 software and then used my Pazzles Inspiration to cut the pieces out. The cute “dear tag” came with the software…so I can’t take credit for that design. I used a round of Velcro to close the purse flap. The lovely flourish cut-out that is on the front and back were also cut with my Pazzles, using a flourish cutting file from the Pazzles “Swirls & Twirls” CD. I so enjoyed designing and decorating this box and I only hope that Cathy likes it too!

Supplies

Papers: Bazzill & Gold Mirror Card
Ink: Tsukineko “VersaMark Watermark”
Embossing Powders: Stamp-n-Stuff “Detail Clear Transparent”
Tools: Pazzles Inspiration, Ranger “Heat It”
Accessories: Brides "Ivory Pearl Seals" from Michaels, Gold Corners by
Spare Parts, Cording for handle and purse flap is “Iridescent White” Craft Cord by Needloft