Showing posts with label Silhouette Cameo. Show all posts

Saturday, March 22, 2014

A special "Thank You" for my "Earth Angels"....and some good news!!!!!!!!!!!

Hello everyone!  This past Wednesday I had my sixth PET scan in 13 months and the good news is that there is no evidence of  the cancer or new tumors!!!!!  Yah....I'm good to go for another four months.  Thank you God!

I don't know if I ever told y'all, but I call all of the medical people that have been taking care of me for the past fourteen months my "Earth Angels", for indeed, that is what they are.  I wanted to make them a special "thank you" card and I also made them some banana pudding and jokingly told them that I took out all of the calories...LOL  They loved the card that I made them and they have posted it on their Facebook wall.  I decided to make the card a "card in the box".  Here are some photos.


Here is an overhead view of it.  I used a rubber stamp and vellum papers to make the balloons and I put the names of all of the people and the doctors on the team on the balloons.  I then used my Bow Easy to make tiny twine bows for each balloon and I made a triple twine bow to go under the "thank you" circle that I cut with my Spellbinders dies using my Big Shot.  The "thank you", "for being" and "my earth angels" were all cut using my Cameo after I designed them in the software.


Here is a close-up of the subway art that I made for the front flap, which I glued down.  I used vellum and a matte photo setting on my printer so that the ink stayed wet and I could heat emboss it with clear embossing powder........love the look!


For the left flap, I went online and found photos of my two doctors, used Photoshop to combine the two photos and then used my Silhouette Studio software to place them within a heart and made them into a print and cut to cut on my Silhouette Cameo.  I then used a Silhouette cutting file to make some angel wings and crowns using silver glitter paper and vellum.........here is a close-up photo.


For the right flap I found a radiology symbol online and made it into a cutting file in my software.  I used the "inlaid" technique and cut it out of silver and black glitter papers.  Here is a close-up.


Making this card was a lot of fun and they loved it!!!  By the way, they loved the banana pudding too!  Thanks for stopping by and hurry back!


Supplies List

Papers:  Recollections "Ivory" 110 lb., DCWV "Glitter Papers" & "Fresh Floral Stack", Vellum
Stamps:  Eureka Stamps "Balloon"
Ink:  Tsukineko "VersaFine Onyx Black" 
Tools:  Silhouette "Cameo", Sizzix "Big Shot, Ranger "Heat It"
Accessories:  Recollections "Pearls",  Cloud 9 Design "Adhesive Accents", Spellbinders Dies, Keepsakes Essentials "Metal Buttons", Recollections "Epoxy Stickers", Martha Stewart "Classic Butterfly" punch, Silhouette "Crown & Wings" by Sweet Afton [Design ID #8616]

Saturday, February 15, 2014

I consider this one my "masterpiece"!!!

For a while now, I've been working on a a 50th birthday card for my youngest stepdaughter who has been battling cancer for several years now and I wanted it to be VERY special....just as she is!!! This is what I've came up with and she loves it!


Here is a close-up of the "50", which was done using the "CentSchbook BT" font.  For the "looks good", I used the "CAC Lasko Even Weight" font and for "on you!" I used the "KG Second Chance" font and a Silhouette "Silver" sketch pen and all of these fonts can be downloaded for free online....just "google" them!  The flowers I used are from the Bridal Dept. at Michael's...I just used a flower sculpting tool to shape them, then enhanced them with a "Silver" Wink of Stella and added pearls to the centers.  I also used my Anna Griffin "Poppy" embossing folder, some Spellbinders Nestabilities and my Martha Stewart "Rose Leaf" and "Branch" punches that I brushed with my "Clear" Wink of Stella Brush Tip Marker.


I made this card into a pop-up and here is a photo of the inside.For the label at the top that says "so, kick up....", I used one of the labels from the "Labels Set of 4" which is a freebie cutting file from Bird's Cards...if you've never been to her site, you really need to go check it out!!!  The font I used is the "KG Second Chance".  For the "HAPPY 50th BIRTHDAY JANICE!", I used some parts from  a Silhouette file called "Happy Birthday Bunting" by Jennifer Wambach [Design ID #15364] and the "Calibri" font.  Now that one was a job as I used silver thread to "hang" the banners...but Janice is so worth it!  Now, for the absolutely adorable shoes and bag, I used another Silhouette file. "Shoe and Purse" by Sarah Bailey [Design ID #8799] which I cut out of Hot Off the Press suede papers and some silver mirror paper for the top of the purse!


Here is a close-up of the shoes and purse.


I always put a "signature label" on the back of my cards and personally sign them and I used another Silhouette file called "Decorative Artisan" by Snapdragon Snippets [Design ID #16056] to make that personal label that I signed.  I used the "Alex Brush" font on it.   Here is a photo of it.


And now, last but not least, here is a photo of the box that I made to house the card as it was way too thick for an envelope.  I used an old Cuttlebug corner die to cut some corners and I cut an oval on my Cameo and embossed it with my "Poppy" embossing folder to go around the oval on the front.  I just used a piece of acetate for the oval window.


This card was a lot of work but also a lot of fun to make and our Janice is well worth it!  Please keep her in your prayers.  Thanks for stopping by!!!

Finished Card Size:  A7 (5"x7")


Supplies List

Papers:  Recollections "Ivory" 110 lb., DCWV "Glitter Papers",  Hot Off the Press "Smoke Suede" & "Black Suede", My Mind's Eye "Wild Asparagus" blue/brown stripe #WA2020
Tools:  Silhouette "Cameo", Spellbinders "Grand Calibur"
Accessories:  Gardner "Brides Flowers", Recollections "Pearls", "Silver" & "Clear" Wink of Stella Brush Tip Markers, Spellbinders Nestabilities "Petite Ovals LG", Martha Stewart "Rose Leaf" & "Branch" punches, Anna Griffin "Poppy" embossing folder

Wednesday, October 30, 2013

OK y'all, I've got lots to talk about and to show...........

you!  First of all, a couple of weeks ago I was introduced to the Wink of Stella Brush Tip Markers and WOW...I love them!!!  My introduction was from this video and blog post by Jennifer McGuire, which also got me to yearning for some Tim Holtz Distress Markers and Watercolor Paper!  I went ahead and ordered a set (Clear, Silver and Black) of the Wink of Stella Brush Tip Markers from 7 Kids College Fund and had a blast with them when they arrived about ten days ago and I particularly LOVE the Clear one!!!  By the way, 7 Kids is a great site to purchase from, their customer service is great and my order arrived quite quickly!  Then this past Saturday I stopped by my local Joann's, armed with one of their 50% off coupons, plus a Michaels 40% coupon and guess what?  They had the Tim Holtz Distress Marker Sets (5 per set) on 40% off, so I picked up a couple of sets...love them.  They coordinate with the Distress Ink pads.  Don't have the watercolor paper yet, but it's on my list...LOL

Now for the other thing I've been into.....there is a site online called all-free-downloads.com and you can download some really cool vector images and after looking through them, my imagination started running wild with ideas for using them on cards.  A dear online friend of mine and her husband just purchased a new home and I wanted to send them a "congrats" card...so when I saw this image, my card started coming together!  The images at their site are .eps format, so I took it into Photoshop and copied it to a new image and saved it as a JPG.  Here are some photos of what I came up with.


Close-up of the little bird.


And an inside view!  I used the "KG Somebody the I used to Know" font.


Please excuse my photography skills but I think you can get the idea!  What is so cool is that you can make a really fantastic card just using the vector images you can download.  Everything on this card is done using my Canon Printer and the "print and cut" technique on my Silhouette "Cameo".   I went into my software and traced the little bird's body so that I could prop her up on pop dots and the only other thing I added, which you can't really see in my photos is that I used the Clear Wink of Stella Brush to add some glitter, plus I created the text on the card front using my Silhouette software and the "2 Peas Mr. Giggles" font and cut it with my Cameo and then added some more of the Wink of Stella Clear to give it so much glimmer!  Also I did emphasize the eye on the little bird with my Black Wink of Stella Brush Tip marker.  My friend loved it!

The other great thing about the vector images you can download is that you after you take them into Photoshop or Photoshop Elements and make them JPGS, you can import them as patterns into your cutter software.  When you look through all of the vector images you will be amazed at what you can choose from!  Go check it out!  I've made another card using one of their images, but I cannot post it until the end of the week............so hurry back and I will see ya then!

Finished Card Size: 5.5"x5.5" Square


Supply List

Papers:  Bazzill "Smooth White" and Bazzill
Tools:  Silhouette "Cameo"
Accessories:  ZIG "Clear Wink of Stella Brush" and "Black Wink of Stella Brush" (bird's eye)

Wednesday, May 23, 2012

Honestly, I have been busy!!!!

I just have not been posting lately.  If you do not keep up a blog, then you have no idea how time consuming it can be!  So in this post, I thought I would post photos of several projects that I have been working on.... all at one time!!!

SILK WALLPAPER COVERED FRAME

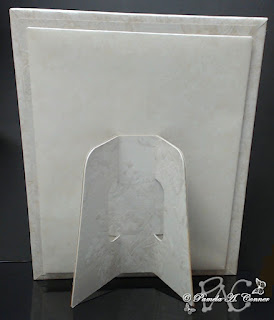
A few weeks ago I started working on a "photo frame" idea that I could make using my Cameo, some thin chipboard, poster board and some gorgeous silk wallpaper samples that my son (who is in management with Lowe's) acquired for me a while back....OMG, I just love them!!!  The inspiration for this frame came from a wooden frame that I saw online (and of course I forgot to save the link and now I can't find it) that had something like seven different layers all graduating inward to the photo...I loved the look and decided to try to create one using paper materials!  What do you think?  My husband loves this!

Front View:


View from the back:


SKETCH PROJECT

One of the other things I've been working on is playing with sketches using a Sharpie Liquid Pencil in my "HotPaws Pen Tool" for my Cameo.  All I can say is WOW!!!  If you don't have one of Sue Reynold's (HotPaws) Pen Tools you are missing out big time!!!  Check out her video!  And here is a link to her site where you can purchase one of them.  I have them for my Cameo/CraftRobo and my Pazzles Inspiration.  Here is a sketch project that I did of a wheelbarrow that was sketched by Douglas Larson at Lettering Delights.  You can find his sketches here....aren't they wonderful!!!


RECIPE BOX


Last but not least, is a Recipe Box that I made for my sister-in-law that had a birthday this past Sunday.  This box was designed by Lori Whitlock.  I absolutely love her designs and the fact that she does videos showing you, step by step, how to assemble them!  Here is a link for blog post and here is a link for her video............check them out!  Here is my finished project:

Front view of box:


Dividers


I want to add that the tiny "brown line" above the decorative border of the box top is vinyl that I cut with my Cameo and so are the "decorative edges" on each side corner of the box bottom!!!  Those "decorative vinyl edges" help add stability and strength to the box.

Thanks for stopping by for a visit.............please don't forget to leave me comments!!!  Come back soon!

Supplies (for recipe box)

Papers:  Bazzill, GA Pacific and  s e i "Desert Springs"
Tools:  Silhouette "Cameo", "HotPaws Pen Tool" for Cameo
Accessories:  Scor-Pal

Thursday, March 29, 2012

Happy Birthday Miss Holly!!!!!

A very special young lady in our family will be turning 23 on April 3rd and I designed and created this card just for her!!!!  We are all very proud of Holly's achievements in the Special Olympics!


Here's the story behind my design for her card.  A few weeks ago I had seen a card with a window, but the window had been made with a die.  Since I own several digital cutters, I decided I would use the software for one of them to make a cutting file of the window along with a window box.  So, I used my Silhouette Studio Designer Edition software and made files to cut with my favorite cutter, my Silhouette Cameo!!!  Holly is our great niece, her grandmother is my husband's sister, Merrylene.  At any rate to make a short story shorter, I decided to make a birthday card from Miss Holly that would be from all of us and got to thinking how it would be cute to use my window cutting file to have Holly looking out a window, kind of like she's looking out to see who's coming.....thus this design!  The window is actually VERY similar to the windows on their house and I then made shutters to match.  For the outside of the house, I used a textured wall paper sample from some sample books that my son got for me and I also used a silk wallpaper sample for the "wall" behind Holly.  The grassy areas as well as the picket fence are Silhouette America cutting files.  The tiny flowers and butterflies were made using punches.

For the inside of the card, the left side is left totally blank for room for everyone to sign the card and here is a photo of the right side:


A dear friend of mine out in CA (Sue, aka/HotPaws) even helped with this card, as she quickly designed the "Happy 23rd Birthday" in a circle while we were talking on the phone the other night and then I added "Holly" and the flower, which is another Silhouette America file.  I sure hope Holly likes it!!!!

Thanks for stopping by for a visit and I would LOVE to hear your comments on my design!

Finished Card Size:  A7 (5"x7")

Supplies

Papers:  Bazzill
Ink:  Tsukineko "VersaMark Watermark", Tim Holtz "Black Soot" & "Vintage Photo" Distress Inks
Tools:  Silhouette "Cameo", Ranger "Heat It"
Accessories:  Martha Stewart "Classic Butterfly" & "Hydrangea" Punches, "Girls are Weird" Font, Stamp-n-Stuff "Star Dust Transparent" embossing powder, Recollections "Pearl" 

Thursday, March 15, 2012

Easter Card for my Grandsons!!!

Yesterday, Splitcoast Stampers had their weekly Sketch Challenge (SCS376) and since I was going to make an Easter card for my grandsons, I decided to do it for the challenge......here is my take on it:


The adorable little "hatching chick" is an image I found through Google Images and turned him into a digi stamp!  I also went into my Silhouette Studio Designer Edition software and did a print and cut of the image, cut it with my Cameo and then hand colored with my Copic & Neopiko markers!  The "flower medallion" is a free cutting file by Monica Bjork called "Laced Frame 27" and you can find it here .....while you are there check out all of her files....they are wonderful!!!  The banner that I cut with my Silhouette "Cameo" is a Silhouette America file and I think it is one of the free ones that comes with the Silhouette Studio software...it is just called "banner 2" and I altered it by adding the "Happy Easter" using the "Stencil STD" font.


I hope my little grandsons like this card!  Thanks for stopping by and I always love reading your comments on my designs.  Hurry back!


Finished Card Size:  A2 (5.5"x4.25")


Supplies


Papers:  Bazzill, GA Pacific, DCWV "Nana's Nursery Baby Boy" Stack
Ink & Embossing Powder:  Tsukineko "WaterMark", Recollections "Signature Sparkle" Embossing Powder
Tools:  Silhouette "Cameo", Ranger "Heat It"
Accessories:  Martha Stewart "Hydrangea" & "Classic Butterfly" Punches, want2scrap "Bling", Stickles "Golden Rod" & "Crystal", "Copic Sketch" & "Neopiko" Markers

Sunday, March 11, 2012

A VERY special young lady & a FREE file...........................

turned 21 on the 7th of March!!!  Jennifer is our youngest granddaughter and I just cannot believe that she is already 21!  She is on the Dean's List at Florida State University and we are SO proud of her.  This is the card that I made for her special day.


I designed the card base using my Silhouette Studio Designer Edition software and at the end of this post I will have links to a free download of the card base if you would like it!  I used a couple of Silhouette America files, which are paid for files, so I cannot share...but if you would like them you can get them at their store.....here are the file names:     happy_birthday_card_C20091116151828_19007
                          beautiful_label_C00397_20509

The font that I used for "OMG...she's legal!", which was done with my Cameo and a Silhouette Sketch Pen is "Boris Black Bloxx" and if you Google it, you can find a free download for it!

Here is another photo showing the card with envelope.  I scanned my designer cardstock so that I could make a liner (which I cut with my Cameo) for the store bought envelope!


For the free file, just select the format that you use and you will be taken to the download.


I hope y'all can use the free file and I would love to hear your comments on this design!  Thanks for stopping by and come back soon!!!

Finished Card Size:  A7 (5"x7")

Supplies

Papers:  Recollections "Modern Bouquet" Paper Pad, Bazzill
Ink:  Tsukineko "VersaMark Watermark"
Tools:  Silhouette "Cameo"
Accessories:  Martha Steward "Classic Butterfly" Punch, Stamp-n-Stuff "Star Dust Transparent" Embossing Powder, Mark Richards "Nailhead Metal Stickers", "Crystal" Stickles

Friday, March 9, 2012

Get Well Soon!!!!!


This is the card that I made from the ovals I created in my March 2nd post.  My inspiration was the "Sketch Challenge" at Splitcoast Stampers the week of February 29th (#SC374).  For those of you that are not a member or familiar with Splitcoast, you can go here to join!  They have different types of challenges every day and by doing them you will learn so much!

The banner that I cut with my Silhouette "Cameo" is a Silhouette America file and I think it is one of the free ones that comes with the Silhouette Studio software...it is just called "banner 2" and I altered it by adding the "Get Well Soon" using the "Stencil STD" font.  It includes a "mat" and after I put it together, I kind of curled it so that it would "bow up"....you can see what I'm talking about in this photo!


At any rate, it was a lot of fun putting this together and I rather like the look.  How about you?

Next, I will be posting a photo that I made for our youngest granddaughter's 21st birthday....so come back soon.  I would love to hear your comments on this card as well!

Finished Card Size:  5.25"x5.25"
Supplies


Papers:  Bazzill, the Paper Studio "Mirabelle" Paper Pack
Ink:  Tim Holtz "Forest Moss" & "Vintage Photo" Distress Ink
Tools:  Silhouette "Cameo", Pazzles "Inspiration", Sizzix "Big Shot"
Accessories:  Spellbinder's "Beaded Oval" & "Classic Oval", want2scrap "Half Pearls", Recollections "flowers"


Tuesday, February 14, 2012

A Valentine Ensemble for my Darling!!!

This is what my darling husband found on the table beside his recliner this morning!


I don't know about the rest you, but I find it very difficult to make masculine cards...but this one was actually the easiest "masculine" card I've designed.  Maybe that's because I went with a lot of black...LOL!

Here is another shot of just the card.....


The beautiful "swirled heart" is an image I found online that I altered somewhat, as there were some tiny hearts included that were "loose" and I left them off.  I traced the image in my Silhouette Studio Designer Edition software, then cut it out of white poster board with my Silhouette "Cameo", covered it in VersaMark and added some "Red Tinsel" embossing powder and heat set with my Range "Heat It"!  It is MUCH prettier in person than it shows in my photo!  I made my own "designer" background paper using a another gorgeous heart image that I found online, traced in my software and then used a Silhouette "Silver" "Sketch Pen" to draw the hearts on black cardstock.  The "key" is a Silhouette America cutting file, cut on smooth white Bazzill and then embossed in gold.  The envelope and the adorable "candy box" are Silhouette cutting files too!

I have to say, my darling husband loved his little Valentine goodies.....which also included some Dove candy! Hope all of you had a nice Valentines Day!  Thanks for stopping by!

Finished Card Size:  Lg. Square (5 1/4"x 5 1/4")
Supplies

Papers:  Recollections "Black", Bazzill "Smooth White"
Ink:  Tsukineko "VersaMark Watermark"
Tools:  Silhouette "Camero", Ranger "Heat It"
Accessories:  Ranger "Queen's Gold" EB Powder, Stamp-n-Stuff "Red Tinsel", "White Pearls Translucent", "Detail Clear Transparent", Michaels "Silver" Half Pearls

Saturday, February 4, 2012

Someone VERY special had a birthday on the 28th!!!!!

In 2009, I served on the Pazzles Design Team and through that association I gained a very special friend named Sue Reynolds and even though we've never met face to face, I feel like I've known her forever!  So, needless to say, the card I made for her birthday had to be as special as she is!  By the way, some of you may know her as "HotPaws"...........she is the creator and owner of the "HotPaws Pen Tools" that work with  a number of the digital cutters...like the Silhouette Cameo, Silhouette SD, CraftRobo, Wishblade, Pazzles Inspiration, KNK Zing, Black Cat Cougar, Cricut and BossKut Gazelle! Here is a photo showing her Pen Tool and some of the many different types of pens that you can use with it.....

such as, from left to right:  Spica, Martha Stewart Marker, Signo, Zig Millennium, Sharpie Ultra Fine Point, Stampin' Up Marker, Gelly Roll and a Pentel "Slicci".  The "Slicci" is very "skinny", so when I use it, I use a "pencil grip" around it to keep it in place.  As a matter of fact, I just got through using the "Slicci" on this card!  If any of you are interested in the "HotPaws Pen Tools", you can find the information you need here!  I highly recommend it and Sue's customer service is the best!  And no, I'm not prejudiced or biased............I'm just speaking the facts!

Now, on to the card.  Here is a photo of the front of the card, which measures 5 1/4" by 5 1/4" square.


There are a few things that I would like to point out about the card front.  First off, the "Border Frame" was designed by me using a Silhouette America "Border" file and I used the "HotPaws Pen Tool" with a Pentel "Slicci" pen to make it and the gorgeous "Medallion" (which you will also see on the "Inside View" of the card) and "Label" were designed by another close friend of mine, Teri Frank......isn't it lovely?  I used different sizes of a Silhouette America "6-Petal" flower file to make the flowers and the "Geometric Background" is also a Silhouette America file.  Everything was cut using my new Silhouette "Cameo" which I just love!

Because this card was going to be mailed, I decided it would be best for me to design a "card box" for it.  I did this design in my Pazzles Inspiration Studio Pro software and it was cut using my Pazzles Inspiration digital cutter except for the "Geometrical Background" which was cut using my Cameo.  I used another one of Teri's "medallions" on the front of the box...just love it!


Here is a photo of the card in the box I designed.


For the inside of the cards I decided to use another one of the frames made using the "HotPaws Pen Tool" and the "Slicci" pen.  The text was printed on vellum with my Canon Pixma and then I covered it with clear embossing powder which I heat set.  Right beneath the vellum is another of the "Geometric Background" digital die cuts.  I also used two more of Teri's "medallions" inside of the card.


And last, but not least, is the back of the card, where I used another one of Teri's labels!


By the way, Sue loved her birthday card and I loved making it for her!  Thanks for stopping by and I would love it if you would leave your comments here at my blog!!!

Finished Card Size:  Lg. Square (5 1/4"x5 1/4")


Supplies


Papers:  Bazzill "French Vanilla", The Paper Company "Ivory Paisley on White", Strathmore "Translucent Vellum"
Ink:  Tsukineko "VersaMark Dazzle", Tim Holtz "Antique Linen" Distress Ink
Tools:  Silhouette "Cameo", Pazzles "Inspiration", Ranger "Heat It"
Accessories:  The Paper Studio "White Half Pearls" and "Faux Pearls" (flower centers), Pentel Silver "Slicci" Pen, Martha Stewart "Rose Leaf" and "Branch" Punches, Stamp-n-Stuff "White Pearls Translucent" and "Detail Clear Transparent" EB Powders, JEJE "Peel-off Stickers" (silver trim on box lid), Scor-Pal, Scor-Tape, HotPaws "Pen Tool" for Silhouette "Cameo"

Wednesday, January 25, 2012

Birthday Card for my darling step-daughter.......

Janice!  Everything on this card was done using my wonderful Silhouette Cameo.  I designed the "Happy Birthday" border and the gorgeous centerpiece is a Silhouette America file.  Here is a photo of the card front:


Here is a photo of the inside of the card where I used the same pink Bazzill and another lovely border file from Silhouette America.


I've got to get back work on another very important project.......so this is short post.  Thanks for stopping by!!!

Finished Card Size:  Lg. Square (5 1/4"x5 1/4")
Supplies


Papers:  Bazzill "Smooth White" & "Berry Blush", Westrim Crafts "Black"
Ink:  Tsukinedo "VersaMark Watermark"
Tools:  Silhouette "Cameo", Ranger "Heat It"
Accessories:  Stamp-n-Stuff "Detail Clear Transparent" EB, Michaels "Silver Half Pearls", want2scrap "Pink Half Pearls, Recollections "Black Half Pearls"

Thursday, January 12, 2012

Birthday Card for my Daughter-in-Law.................

and my 1st card of 2012!!!  Nicole's birthday is on the 12th and I really wanted to make something special for her.  Last week I purchased a new DCWV stack called "French Country" and I fell in love with it so I decided I definitely wanted to use it for her card!!!  This is what I came up with!

For the card front I made sure that I used the top left corner of one of the papers that I particularly liked and in order to do that, I had to make this a very large card, in fact a size A9 which is 8.5"x 5.5".  I used a Silhouette Amercia "Happy Birthday" file that I altered by adding some flowers to it and designed a mat to go behind it.  I also heat embossed the "Happy Birthday" three times and added some Swarovski crystals  for some bling!


Here is a close-up of the "Happy Birthday":


Here is an inside view.  I designed a "pocket" in Silhouette Studio, to hold a note that I wrote to Nicole, along with some trim!


Finished Card Size:  A9 (8.5"x5.5")
Supplies

Papers:  GA Pacific (card base), Bazzill "French Vanilla", DCWV "French Country" Stack, Parchment Card (Sentiment)
Ink:  Tsukineko "VesaMark Watermark", Tim Holtz "Vintage Photo" Distress Ink
Tools:  Silhouette "Cameo", Ranger "Heat It"
Accessories:  Martha Stewart "Doily Lace" Border Punch & "Monarch Butterfly" Punch, Swarovski Crystals, Stamp-n-Stuff "Detail Clear Transparent" EB Powder