Showing posts with label Nestabilities. Show all posts

Saturday, February 15, 2014

I consider this one my "masterpiece"!!!

For a while now, I've been working on a a 50th birthday card for my youngest stepdaughter who has been battling cancer for several years now and I wanted it to be VERY special....just as she is!!! This is what I've came up with and she loves it!


Here is a close-up of the "50", which was done using the "CentSchbook BT" font.  For the "looks good", I used the "CAC Lasko Even Weight" font and for "on you!" I used the "KG Second Chance" font and a Silhouette "Silver" sketch pen and all of these fonts can be downloaded for free online....just "google" them!  The flowers I used are from the Bridal Dept. at Michael's...I just used a flower sculpting tool to shape them, then enhanced them with a "Silver" Wink of Stella and added pearls to the centers.  I also used my Anna Griffin "Poppy" embossing folder, some Spellbinders Nestabilities and my Martha Stewart "Rose Leaf" and "Branch" punches that I brushed with my "Clear" Wink of Stella Brush Tip Marker.


I made this card into a pop-up and here is a photo of the inside.For the label at the top that says "so, kick up....", I used one of the labels from the "Labels Set of 4" which is a freebie cutting file from Bird's Cards...if you've never been to her site, you really need to go check it out!!!  The font I used is the "KG Second Chance".  For the "HAPPY 50th BIRTHDAY JANICE!", I used some parts from  a Silhouette file called "Happy Birthday Bunting" by Jennifer Wambach [Design ID #15364] and the "Calibri" font.  Now that one was a job as I used silver thread to "hang" the banners...but Janice is so worth it!  Now, for the absolutely adorable shoes and bag, I used another Silhouette file. "Shoe and Purse" by Sarah Bailey [Design ID #8799] which I cut out of Hot Off the Press suede papers and some silver mirror paper for the top of the purse!


Here is a close-up of the shoes and purse.


I always put a "signature label" on the back of my cards and personally sign them and I used another Silhouette file called "Decorative Artisan" by Snapdragon Snippets [Design ID #16056] to make that personal label that I signed.  I used the "Alex Brush" font on it.   Here is a photo of it.


And now, last but not least, here is a photo of the box that I made to house the card as it was way too thick for an envelope.  I used an old Cuttlebug corner die to cut some corners and I cut an oval on my Cameo and embossed it with my "Poppy" embossing folder to go around the oval on the front.  I just used a piece of acetate for the oval window.


This card was a lot of work but also a lot of fun to make and our Janice is well worth it!  Please keep her in your prayers.  Thanks for stopping by!!!

Finished Card Size:  A7 (5"x7")


Supplies List

Papers:  Recollections "Ivory" 110 lb., DCWV "Glitter Papers",  Hot Off the Press "Smoke Suede" & "Black Suede", My Mind's Eye "Wild Asparagus" blue/brown stripe #WA2020
Tools:  Silhouette "Cameo", Spellbinders "Grand Calibur"
Accessories:  Gardner "Brides Flowers", Recollections "Pearls", "Silver" & "Clear" Wink of Stella Brush Tip Markers, Spellbinders Nestabilities "Petite Ovals LG", Martha Stewart "Rose Leaf" & "Branch" punches, Anna Griffin "Poppy" embossing folder

Thursday, December 30, 2010

Wonderful Gift Box!!!!!!

I found the idea for this gift box here and if you check out her entire blog, Elly does some absolutely beautiful work!!!  I set about making a cutting file for this project so that my Pazzles Inspiration Creative Cutter would do all of the cutting for me, which is always nice!  The only thing that was not done using my PI was the Spellbinders Labels Two and the Martha Stewart "Eyelet Lace" punched border.  The "dahlia" flower is from a template I purchased from "Fred She Said" (you can find it here) and I even set it up for my PI to cut all of them out for me!  Something else that I want to point out is that I've used some silk wallcovering samples from Lowe's in the making of this box and............I LOVE it!!!

Here is a photo of the top of the box:


Here is a photo of the box opened up.....as an extra security I used some brads to attach the box tray to the card section:


And last but not least, here is a close-up photo of the flower I made:


I used this gift box to hold a Christmas gift.  Thanks Elly for the marvelous idea!!!


Supplies


Paper:  Bazzill "Mystique", Strathmore "Parchment" and "Silk Encyclopedia (silk wallcovering samples from Lowe's)
Ink:  Tim Holtz "Old Paper" Distress Ink
Tools:  Pazzles "Inspiration Creative Cutter" and Provo Craft "Cuttlebug"
Accessories:  Spellbinders "Lables Two", Spare Parts "Brads"

Monday, November 8, 2010

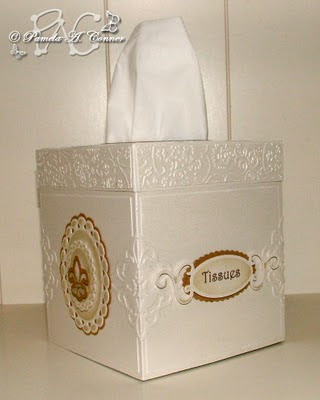
Just one more tissue box cover..........................

and this time I made one for me!!!  For those of you that would like to make some of these, you can find a written tutorial as well as a wonderful video here!

Here is a view of the top of the cover:


And here is a view of two of the sides:


And last but not least the other two sides:


I do believe this is all of the tissue box covers that I will be making for a while!LOL Thanks so much for stopping by to have a look.........and hurry back!!!  Hopefully I will have a new card design soon!

Supplies


Paper:  Bazzill and Bazzill Bling
Ink:  Tim Holtz "Old Paper" Distress Ink and Tsukineko Brilliance "Platinum Planet"
Tools:  Pazzles "Inspiration Creative Cutter", Provo Craft "Cuttlebug", Sizzix "Big Shot"
Accessories:  Provo Craft Cuttlebug "Textile" Embossing Folder and Spellbinders "Beaded Ovals", Shapeabilities "Fancy Tags" and "Symbology, Shapabilities Pendants "Fleur De Lis" and Nestabilities "Long Rectangles and Long Scalloped  Rectangles SM"

Friday, March 19, 2010

I guess you can say that I "fabricated" this one!!!


This is my card for this week's Splitcoast Stampers "Sketch Challenge" (SC272) and if you want to play too you can find all the pertinent info here! The reason I said "fabricated" is that I used some beautiful fabric that I found at a new quilting store in my area on Tuesday....naturally I could not resist buying a piece of it!!! I adhered it to a piece of cereal box that I cut using my Pazzles Inspiration Creative Cutter and then ran through my Xyron machine. The absolutely gorgeous 100% silk ribbon that I used came from Sharon Johnson at "No Time to Stamp" and if you would like to purchase some from her, you can find it here. I hate to admit it, but I bought my first order from her about a year ago and I've been hording it and I just ordered some more from her a couple of weeks ago and I'm going to start using it more often. It's so great to work with and it looks stunning!!!! For the "medallion" I used a corner punch by Martha Stewart and Becca's (Amazing Paper Grace) technique.

Now, to the butterfly and you can get a better, larger view of it by clicking on my photo above. A dear friend of mine sent me this birthday card for my birthday in 2008 with some beautiful butterflies on it that were from a stamp set she has. I used them as a model for one I designed to cut and emboss using my Pazzles Inspiration and the Pen Tool that Sue Reynolds, aka/HotPaws designed that will hold many different sizes of pens. I cut two layers and used fun foam to "elevate" the wing tips. Thanks for looking and have a great weekend!!!
Finished Card Size: A2/5.5"x4.25"

Supplies

Papers: "Kiwi Iridescent" Effects Papercraft by Canson (butterfly), Darice Paper Crafter, "The Chocolate Box" by Core'dinations, Bazzill
Stamps: "Spring Blossoms Clear Stamp Set" by Inkadinkado (flower and sentiment)
Inks: ColorBox
Tools: Pazzles "Inspiration Creative Cutter", QuicKutz "Revoltion", Range "Heat It"
Accessories: Ranger "Super Fine Detail Gold" Embossing Powder, "Bow Easy", 100% Silk Ribbon, Spellbinders Nestabilities, Martha Stewart "Loops" Corner Punch, "Say it with Bling" and "Say it with Pearls" by want2scrap, Copic Spica "Pink", Beifa Gel Pens

Saturday, February 6, 2010

And I'm back, yet again!...............


Well, as you can tell by my lack of activity here at my blog, I've been in a bit of a creative slump and I have to thank a very nice lady by the name of Velta for encouraging me to get back to work! The other day, I had stopped by her blog as I do frequently and I was so impressed by a card she had just posted (you can see it here at her blog) that I left her the following comment:

"Oh Velta, this is so beautiful!!!! I've kind of been going through a creative slump lately and this is just the inspiration I need to snap out of it...thank you!!!"

Well, she visited here at my blog and left the following comment:

"Oh MY Pam ~ I have been through your blog and your talent is amazing. All of your creations are so elegant...just what I like! Thank you for stopping by and commenting on my blog! It is hard for me to understand (other than the holidays) with your talent how you could be in a slump...Get on out here girl and get to work...I want to see more of your art!!!"

After reading her comment, I happened across a link to the Flourishes Newsletter and the first item I saw was "What's Your Cup of Tea? Challenge!" Well, to be honest I found that interesting and decided to take the challenge and make a Valentine card for my husband. My morning beverage is "Starbucks Breakfast Blend" and I went from there. Now, mind you this is not the best card I've ever designed, but my DH does not like "fluffy, girly" stuff, so I tried to keep it simple. Here is a photo showing the Starbucks bag along side of the card I designed:

and here is a close-up of the digitally stamped image I used:

This adorable little snail was a freebie from doodlepalace.com. I actually altered the image by cutting of the tail, changing the envelope sentiment, replacing the antennae with wire ones and adding the eyelashes. I colored the image using markers by Neopiko.

I also want to point out that the paper piercing that I did on this card (the sun rays) was done using my new "Piercing Tool" for the Pazzles "Inspiration Creative Cutter". The needle that I used in it was not quite large enough, so I used a manual piercing tool to make the piercings larger....I need to go to Hobby Lobby and purchase a larger sewing machine needle!

Thank you so much Velta for giving me the "boost" that I needed!!!

Thanks so much for stopping by!!!
Finished Card Size: 5.5"x5.5"
Supplies

Paper: Core'dinations, Daisyd's "Playtime Dots - Pink & Yellow #14061" (hearts border)
Stamps: "Snail Mail" digital freebie from Doodle Palace and Studio G
Ink: Memento "Rich Coccoa"
Tools: Pazzles "Inspiration Creative Cutter", QuicKutz "Revolution"
Accessories: Spellbinders "Nestabilities", Neopiko Markers, Ranger "Diamond" Stickles, Martha Stewart "Lace Heart" Edge Punch, Recollections "Pearl Stickers"

Monday, November 2, 2009

I LOVE this technique!!!!!

Double Embossing or Blank Embossing was the technique for today's challenge (TLC245) at Splitcoast Stampers......you can check out all of the details here at the site. Lynn sent us to a video by Nilda at "The Cuttlebug Spot" and earlier this morning the video was not working, but it is now. Once I watched Nilda's video this technique was a lot easier and I really had fun with it!!! Click on the photo below for a close-up of it:


There were a lot of "firsts" with this card.............first time I've used this technique, first time I've used this embossing folder, first time I've used these stamps, first time I've used my new Memento "Rich Cocoa" ink pad and the first time I've made my own "ribbon corners"!!! For all of my coloring, I used glitter and metallic pens. I also designed a Pazzles cutting file for the matching, lined envelope and I used the same embossing folder on the envelope too. Thanks for stopping by to take a peek!
Finished Card Size: A2/4.25"x5.5"
Supplies

Paper: GA Pacific
Stamps: Recollections "Timres Transparent Merry Merry"
Inks: Tsukineko Memento "Rich Cocoa"
Tools: Provo Craft "Cuttlebug" and Pazzles "Inspiration Creative Cutter"
Accessories: Stampin'Up! "Textured Impressions Finial Press" embossing folder, Bow Easy, Beifa "Glitter & Metallic Gel Pens", Offray Ribbon, Spellbinders Nestabilities "Labels Four"

Friday, October 9, 2009

Booooo!!!!!


I'm not positive, but this may well be the first time I've made a Halloween card! Today for the "Limited Supply Challenge" (LSC241) we were supposed to do a "FALL-themed" card with stamps, paper and ink.....NO embellishments! It was alright to use diecuts, but the focal point should be something STAMPED. If you would like to join in the fun, you can find all the pertinent information here! For mine I used this adorable "mummy" stamp by Recollections, cut him out and used black fun foam pieces to adhere him with dimension. I also used a stamp for the "sentiment and I colored the pumpkin on it with some Neopiko markers. All of the background was done using die cut files from Pazzles and they were cut with my Pazzles "Inspiration Creative Cutter" and my Craft Robo. For the creepy spider, I used some clear embossing powder and heat set it to give her a shiny, black widow look! Don't you just love that haunted looking house with the orange moon? I'm sure my little grandsons will love this!
Finished Card Size: A2/4.25"x5.5"
Supplies

Paper: Black, orange and blue grey CS (don't know brands...have had for years!)
Stamps: Recollections "Mummy" and "October Calender" by Studio G
Inks: Tsukinedo "Graphite Black" Brilliance and Memento "Tuxedo Black"
Embossing Powders: Old Town Crafts "Black Jewels" (sentiment) and Stamp-n-Stuff "Detail Clear Transparent"
Tools: Pazzles "Inspiration Creative Cutter", Graphtec "Craft robo", Ranger "Heat It" and Provo Craft "Cuttlebug"
Accessories: Spellbinders "Standard Circles & Scalloped Cirles SM", Neopiko Markers

Thursday, October 8, 2009

Playing with my new SU "Petals-a-Plenty"!!!

Last week I placed my very first order of Stampin'Up products and they arrived later yesterday afternoon, so of course I had to play with one of them today! I've seen many cards done using the "Petals-a-Plenty Textured Impressions" embossing folder and I decided to order it. I also used the Splitcoast Stampers Wednesday Sketch Challenge (SC249) as my inspiration. If you want to play along you can find it here. As you can see by my photos, these images were very difficult to capture. They look much better IRL (in real life), particularly the beautiful snowflake.


Here is a close-up of the snowflake:


I cut two blue panels and ran them through my Big Shot using the Stampin'Up "Petals-a-Plenty" embossing folder. On the first blue layer I used the debossed side and brushed over the top of it with my Brilliance "Platinum Planet" and then used a silver glitter pen on the circles in the middle of each flower. I did the very same thing on the top blue panel and the top white panel, but I used the embossed side! The gorgeous snowflake is actually from the letter "E" of the font called "Faux Snowflake BRK" and was cut out using my Craft Robo digital cutter. I used white card stock that was stamped with the "Platiunum Planet" then covered with "Star Dust" embossing powder and heat set with my heat gun...did this twice and then added a flat-backed pearl! The "faux stitching" on the horizontal blue panel was actually done using the silver glitter pen in the Pen Tool on my Pazzles "Inspiration Creative Cutter".

I have to say that I LOVE my new Stampin'Up embossing folders (I also ordered the "Elegant Bouquet" and the "Finial Press")...you will seeing lots of cards made by me using them!!!

Thanks for stopping by to take a peek!!!
Finished Card Size: A2/4.25"x5.5"
Supplies

Papers: Bazzill and GA Pacific White CS
Stamps: Studio G "December Calendar Stamp"
Inks: Tsukineko "Platinum Planet" Brilliance Pigment & VersaMark "Watermark"
Embossing Powder: Old Town Crafts "Ultra Fine Silver" and Stamp-n-Stuff "Star Dust Transparent"
Tools: Pazzles "Inspiration Creative Cutter", Graphtec "Craft Robo", Ranger "Heat It", Sizzix "Big Shot" and Provo Craft "Cuttlebug"
Accessories: Martha Stewart "Floral Lace Edge" Border Punch, Spellbinders Nestabilities "Standard Circles & Scalloped Circles SM", Mark Richards "Pearl Perle", Michael's "Silver Half Pearl Stickers", Beifa "Silver Glitter" Gel Pen, Ribbon (remnant that I had on hand, but looks much like the "Bridal Elegance" from Michaels)

Monday, October 5, 2009

"Faux Suede" Technique

OK, so I've been playing today! I decided to do the "Technique Challenge" (TLC241) at Splitcoast Stampers and this is my first try at this technique. If you would like to play too, you can find it here! First of all, please click on the following image to get a larger view:


The wine/burgundy cardstock the I used for the "faux suede" is some that I've had in my stash for years and I'm sorry, but I don't know who made it. I actually just started out to practice with it, but when I got through preparing it, I decided it was a "keeper", so then I started selecting other papers to go with it. I chose some black cardstock and a piece of "Wild Rose" patterned paper...I thought they all looked great together! I decided to keep my color scheme to the wine/burgundy, black and white. I used the same wine/burgundy cardstock (without making it "faux suede") for the outer labels frame. For the die cut corners, I used a piece of black from the Best Occasions "Metallic Paper Pack" since the shinny look of it matched the black satin ribbon that I used. This was a fun technique and I will certainly be using it again!!!

Thanks for stopping by!!!
Finished Card Size: A2/4.25"x5.5"
Supplies

Papers: Provo Craft Color Wheel Palettes "Wild Rose Bitty Pad" (patterned paper), Best Occasions "Metallic Paper Pack" (black metallic), Wine/Burgundy CS, Recollections (black CS)
Stamps: PSX (F-1741) "Asian Bamboo Shoots" and Inkadinkado "Spring Blossoms Clear Stamp Set (Thinking of You)
Ink: Tsukineko Brilliance "Graphite Black" pigment
Tools: Pazzles "Inspiration Creative Cutter", Provo Craft "Cuttlebug"
Accessories: Spellbinders Nestabilities "Labels Four", Provo Craft Cuttlebug "Vintage" die, Offray "Black Satin" Ribbon, Range "Black Diamonds" Stickles (flower centers), Flower Punches

Tuesday, August 25, 2009

I LOVE this little frog image!!!


I'm really pleased with this card that I've made for my brother for his birthday. The frog is a digital image that I created in Photoshop CS3 from a font called "KiddyDing". I used the "w" for the frog and the "q" for the mushroom, printed it out twice and colored the image using my Copic & Neopiko markers. I also have to add that the frog was a "boy" and I turned him into a "girl" by adding the eyelashes and the red lips!!! The "sentiment" was done using my "Basic Black" Stampin Up marker in the Pazzles Inspiration Pen Tool and a Pazzles font called "Engineer"...in other words, my PI did the writing for me.....love that feature!!! The "52" was cut out of "Sequins Silver" vinyl using my Pazzles Inspiration digital cutter too. The cupcake is clipart from Graphics Factory.com. I used a Card Sketch (SC79) from Splitcoast Stampers.
Finished Card Size: A2/5.5"x4.25"

Supplies

Papers: Embassy Black Cardstock (card base), Westrim Crafts (other black CS), Darice Paper Crafter CS (green CS) and GA Pacific White Carstock
Tools: Pazzles "Inspiration Creative Cutter" and Provo Craft "Cuttlebug"
Accessories: Spellbinders Nestabilities "SM Classic Rectangles & SM Classic Scalloped Rectangles", Copic Sketch Markers, Neopiko Markers, The Robins Nest "Dew Drops", Marvy Uchida "White Liquid Applique" (I colored it green using Making Memories "Celery" paint), Stampin Up Black Marker, "Sequins Silver" vinyl and Provo Craft Cuttlebug "Stylized Flowers" & "Tiny Bubbles" embossing folders.

Sunday, August 16, 2009

How about a masculine touch!!!


I made this card today for the Splitcoast Featured Stamper Challenge (FS132) and I'm so pleased that when completed, it really took on a nice masculine look! We have a dear friend whose birthday is on the 25th and I've earmarked this for him! You can find all the details about this challenge here if you would like to play too! Here is the card that inspired me!!! She did not mention the size of this card, so I decided to make mine 4"x9.25".

The main difficulty with this project was getting a good photo of it, which happens quite often! In the previous photo, the middle "square's" stamped image can hardly be seen, so here is a close-up of it!


The stamped sentiment is hard to see in the full photo too, so here is a close-up of it too!

Thanks for looking!!!

Finished Card Size: 4"x9.25"

Supplies

Papers: Westrim Crafts (Black CS), "Silver Swirl on White" by The Paper Company and "Kings Gold" Metallic CS by Wausau Paper
Stamps: "Lotus Greeting Stamps" by Amy Butler for K & Company (sentiment) & Hero Arts "Leaf Prints"
Ink: VersaMark "Watermark" by Tsukineko
Embossing Powders: Ranger "Super Fine Detail Gold, Old Town Crafts "Ultra Fine Silver" and Stamp-n-Stuff "Detail Clear Transparent"
Tools: Pazzles "Inspiration Creative Cutter", Cuttlebug, Ranger "Heat It", Martha Stewart "Arch Lattice" Border Punch
Accessories: Spellbinders Nestabilities"Small Standard Circles" & "Small Scalloped Standard Circles",
Provo Craft Cuttlebug "Vintage" die & "D'vine Swirls" embossing folder, Offray "Black Satin" Ribbon


Thursday, August 13, 2009

Mother's Day........already?????


I've actually made this card for my seven year old grandson to give to his Mom for Mother's Day 2010. That adorable little "Precious Moments" boy reminds me of him!!! I will just store this card for him until May. I'm using this card for Splitcoast Stampers Color Challenge (CC231 & you can find it here) "Don't Fade Away", where you use bleach to do your stamping and use whatever color the cardstock bleaches out to as your second color (in this case a cream color). I'm also using it for the Sketch Challenge 241 and you can find it here.

I actually used a dingbat font called "Precious Moments Love 1" (letter "L") to make a digital stamp that I then colored with a combination of my Neopiko & Copic markers. I used some Stickles in the center of the flower. I designed the striped overlay using my Pazzles "Inspiration Studio" software and then cut it on gold metallic cardstock. I have not completed to inside of the card yet, as I want my grandson's input before doing so!

PS. I just changed out the photo of this card because today (8-14-2009), I found some ribbon that kind of matches the card that I like better, so I removed the old bow and added a new one!!!

Finished Card Size: A2/4.25"x5.5"


Supplies

Papers: Best Occasions "Metallic Paper Pack" (gold metallic CS), Gina K "Pure Luxury" (digitally stamped image) and GA Pacific (card base)
Stamps: StampCraft (bleached images)
Tools:
Pazzles "Inspiration Creative Cutter" and Provo Craft "Cuttlebug"
Accessories: Provo Craft Cuttlebug "Leafy Branch" embossing folder, Spellbinders Nestabilities "Long Rectangles Large" and "Long Rectangles Scalloped Large", The Robins Nest "Dew Drops" and Offray Ribbon (tied using the "Bow Easy")

Sunday, July 12, 2009

Here's the Stationery Box that I made for Merrylene.....


back in May for her birthday. I got all my ideas for this project here! This next photo shows the box opened up. As you can see, I made a few changes, such adding an Address Book, a Note Pad and some Mailing Labels. I also glued the inner flap and added a decorative border.


Here are closeups of the Address Book and the inner pages of it and the Note Pad. I designed the inner pages using Photoshop and then did a "Print and Cut" using my Pazzles "Inspiration Creative Cutter".


And here are close-up photos of the six cards that I included with the box.


This project was fun, but it was also a lot of work, but it was worth it to be able to give it to Merrylene as a gift. By the way, she loved it!!!


Supplies

Papers: Bazzill and "Wild Asparagus" (all of the designer papers) by My Mind's Eye
Stamps: Anna Griffin "Flourishes Set 3" and Martha Stewart "Monogram and Frame Stamps"
Ink: "VersaMark Watermark" by Tsukiniko
Embossing Powder: Stamp-n-Stuff "Detail Clear Transparent"
Tools: Pazzles "Inspiration Creative Cutter", Zutter "Bind-It-All", Provo Craft "Cuttlebug", and "Scor-Pal"
Accessories: Fiskars "Sunburst" Border Punch, Ranger "Liquid Pearls", Tim Holtz "Distress Inks", Mark Richards "Crystal Stickers Pearls", Offray Ribbons, Spellbinders "Nestabilities", The Robbins Nest "Clear Dew Drops" (I colored them brown using Bic Marker), Bride's Flowers by Gartner Studios (purchased at Michael's and altered by me using a tiny paint brush and water color pencils)

Saturday, March 21, 2009

My friend Teri said this looks good enough to eat!


I made this little “Thinking of You” card for the Splitcoast Stampers Limited Supplies Challenge (LSC212) yesterday. I know that I wanted to use my new ($1.00 from Michaels) Hampton Arts “Tulips” stamp and since we were supposed to use soft colors, I decided to use watercolor paper and do a washed background using pastel colors. I had also used watercolor paper for the image, except instead of using watercolors for the image I used a technique with my Sharpies and alcohol. I colored on a ceramic tile using my Sharpies and then dipped my brush in alcohol and picked up pigment off of the ceramic tile! The sentiment was done using Photoshop CS3 and some digital brushes that I have. I used the Edwardian Script ITC font. The large lavender flower was designed by a lady (Doris the Crafter) at the UK Scrappers site and was cut using my Pazzles “Inspiration Creative Cutter”. I "paper sculpted" all of the flowers. I hope you like!

Here is a close-up of my coloring:


Finished Card Size: A2/4.25”x5.5”


Supplies

Papers: GA Pacific White CS, Darice Paper Crafter CS and Bienfang Watercolor Paper
Stamps: Hampton Art designed for Studio G
Ink: Brilliance “Graphite Black”, “Pearlescent Purple” & “Pearlescent Yellow”
Tools: Pazzles “Inspiration Creative Cutter, Quickutz “Revolution”, Fiskars “Sunburst Border Punch”, Fiskars “Flowers” Corner Punch, and EK Success Flower Punch
Accessories: Spellbinders “Standard Circles & Standard Scalloped Circles SM” Nestabilities, Offray “Sheer Petit Dot Orchid” & “Lavender” Ribbons, “Crystal” Stickles, “Petal Pink” Liquid Pearls, Sharpie Ultra Fine Point Permanent Markers and Daler Rowney Watercolors

Thursday, February 26, 2009

"Frugal Finds"..................


Today at Splitcoast Stampers, Julia came up with the idea of “Frugal Finds” for the “Ways to Use It” Challenge. Well, what could be more frugal than FREE background paper designs? One of the blogs that I check out, almost daily, is Jak Heath’s “Crafters Kitchen” and the other day she had some lovely “Damask Papers” that she designed and offered for free download and I just fell in love with them!!! You can find them here. She also made a card using them that I used for my inspiration and you can find it here. Another item I consider frugal is that I used clear Dew Drops that I colored black using my black Sharpie! The little “birthday” tag was designed by me and cut with my Pazzles “Inspiration Creative Cutter”. “Happy Birthday” was hand written by me!
Finished Card Size: A2/4.25”x5.5”
Supplies
Papers: GA Pacific White CS, Bazzill, “Metallic Black” Best Occasions Metallic
Paper Pack and Westrim Black CS
Stamps: Hero Arts (Flower) and Lotus Greeting Stamps by Amy Butler, K&Co.
Ink: StazOn “Jet Black” & “Graphite Black” Brilliance Pigment”
Tools: Pazzles Inspiration and Quickutz “Revolution”
Accessories: Spellbinders “Long Rectangles & Long Scalloped Rectangles”
Nestabilities and “Photo Corners”, “Black Diamonds” Stickles, The Robbins Nest “Clear Dew Drops” and Offray
“Poly Fleur” Ribbon

Sunday, December 21, 2008

I call this my "Praying Hands" Christmas card.......


I actually completed this card design last week and I’ve made a number of them to give to family members and close friends. I wanted to design a card that was simple and had the “true meaning of Christmas” as it’s main theme…so, what the card has to say is the main thing and this one says quite a bit as you can see by this inside view. Double-click on the photos for a larger view so that you can read the text. The “praying hands” are some I found in my “Images” folder on my PC, I just printed them on my inkjet printer and then chalked around the edges. You can see a larger view of the inside of card here.

Finished Card Size: 5.25”x7.25”

Supplies

Papers: “King’s Gold” Wausau Creative Collection Metallic Cardstock, GA Pacific
White CS & Bazzill
Tools: Pazzles Inspiration, QuicKutz Revolution
Accessories: “Venitian” EK Card Creator, Spellbinders “Long Rectangles Large” Nestabilities