Thursday, February 20, 2014

Let's organize our bits and pieces of ribbons, fibers and twine & a "free" file!!!!!!

If y'all are like me, then you have bits and pieces of ribbons, fibers, twine, etc. that you know you will use and don't want to throw out....but where ya gonna keep them????  Well, I think I have come up with a solution and I want to share it with you!!!!

I designed a "spool" to put these items on and then I decided I needed special boxes to store them in so that I could see, at a glance, what I have available and not have to go through tons of containers.  The box I designed has an opening at the top.........I used a piece of acetate, but you could use anything that you can see through...like thin vellum or even a piece of a page protector!  For the spools, I cut them out of poster board and glued two of them together........but you could cut them out of chipboard or cereal box depending on what media you can cut with your electronic cutter.  Here are some photos of mine.

This photo shows the spools too.


Here is a close-up of it.


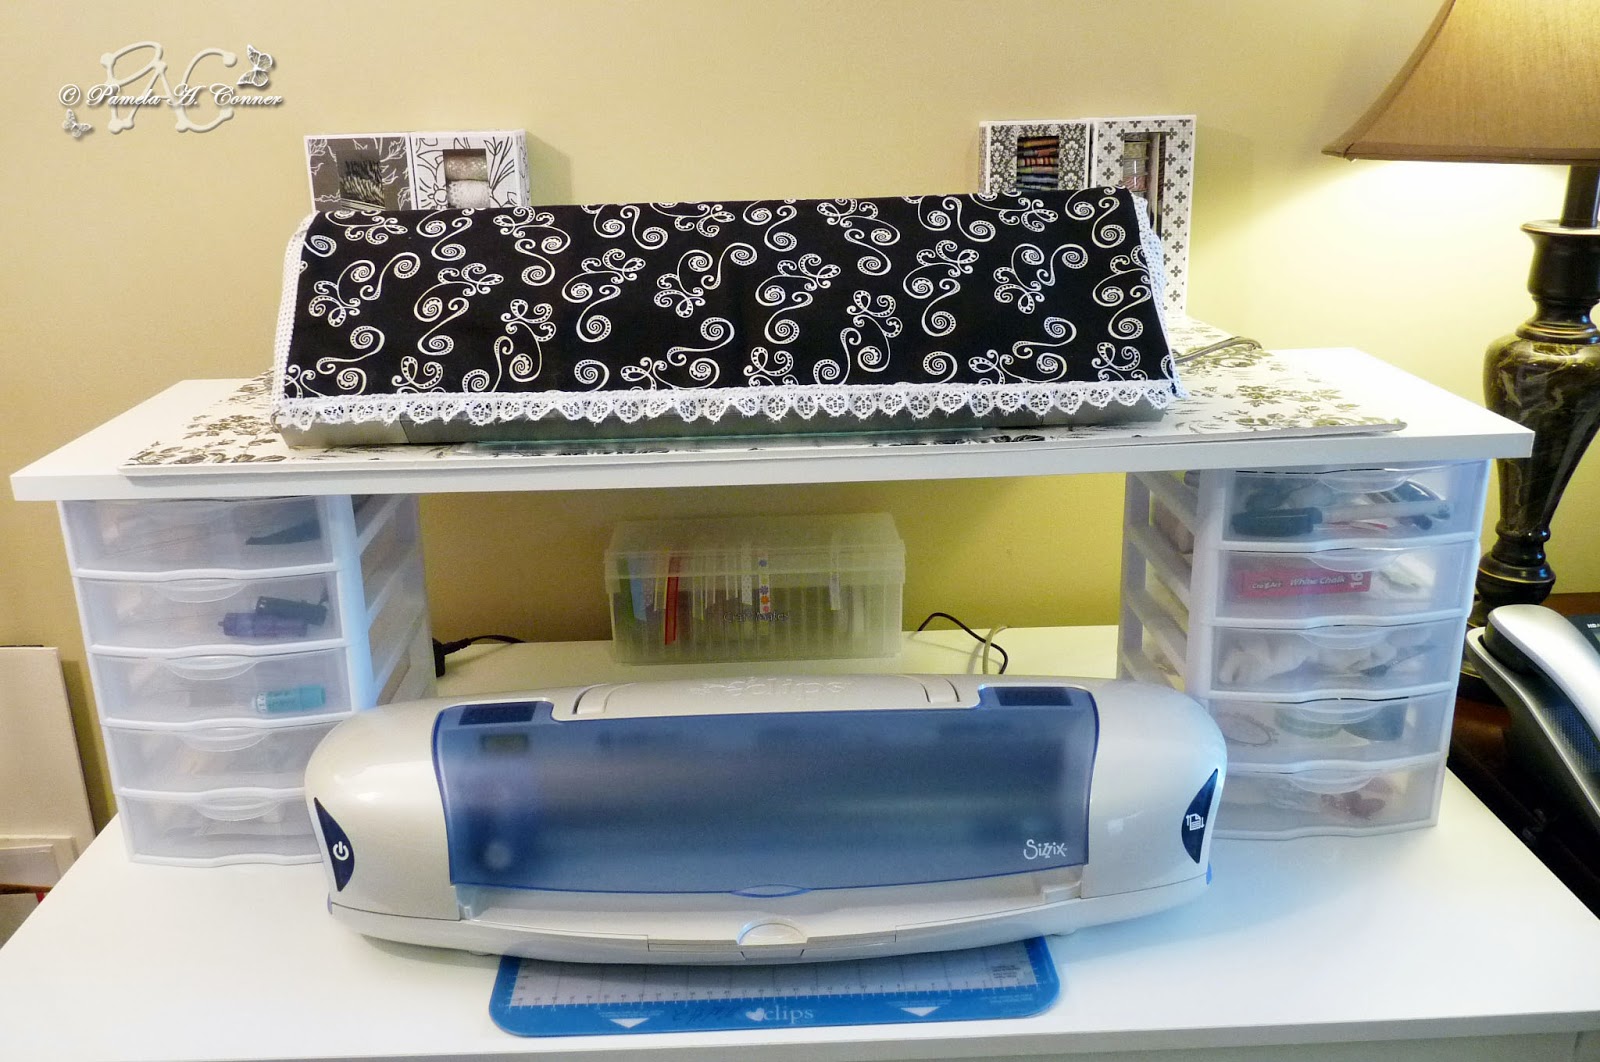
This is a photo of the four I've made for my craft room so far.....three are almost full and I made a forth one to have on hand for the future!  This is my "cutting table" and behind the boxes is my Big Shot, under the cover my friend Tammy made for me to match my craft room theme of "black and white".  Isn't it a gorgeous cover?  As you can see I used those colors for my boxes too!  Over to the left is my new trimmer, a "Fiskars ProCision", and so far I am loving it!


And here is where I decided to keep my boxes.  This is actually my "electronic cutter station"...but the boxes fit perfectly on the wall behind my Cameo (Tammy also made the cover for my Cameo...love it) and as you can see, it is super easy to see what is in the boxes!!!


Now, while I have your attention, I want to talk to you about glue/adhesives.  Since December I have almost exclusively been using a glue that is new to me and OMG...I'm in love.  It is the ScrapFusion glue by Ivy Hollow and I have to say that it is my all-time favorite.  I love the needle-nose applicator and I love everything about it.  This is what I used to glue my boxes together and adhere the patterned panels.  If you've never tried it, go by their site and check it out.  I ordered the "Variety Pack", but if you just want to try one bottle, get the needle tip bottle...you won't regret it!  I also want to add that I had an occasion to contact them and their customer service is very bit as good as their product!!!

If you would like the "free" files for this system, just go here to download them......I have included Studio, MTC and SVG formats!!!  Enjoy and get organized!!!


PS.  I forgot to mention that you need to use heavy cardstock for the boxes...........I used the Recollections 110 lb cardstock and it worked just great!!!

Wednesday, February 19, 2014

OK, let's talk about......................

utilizing our electronic cutters to make our own "word dies"!!!  I keep seeing all kinds of cards that have "hello" or "thanks" on them that have been cut by dies and they look fantastic and I keep toying with buying some, but after spending what I have spent over the past seven or eight years on electronic cutting machines, it seems like a real waste of money.  Trust me, my DH would surely think so!

At any rate, this morning I was watching a YouTube video where she used a "hello" die cut and I decided to try to make my own.  I wrote "hello" on a piece of white paper with a black pen and scanned it into Photoshop and then into my cutter software and made me an "hello" cutting file.  I cut it out of poster board, which I love to use because it's a little thicker and then I used some VersaMark on it and covered it in white embossing powder and heat set it...I did that two more times and here is the result I got.


Here is a close-up view of the "hello".


Just think of all of the possibilities of making cards with the words being in your own handwriting versus using a font!!!  Also, the good thing about making your own "die cut" file is that you can re-size it to fit your project!  Now go play with this idea and see what all you can come up with.....like "best wishes", "thanks", "congrats", "get well" and on and on.  Have fun and be creative!!!!  I will be back tomorrow with something really special for organizing your craft rooms which includes a "free" file and who does not like free?


Saturday, February 15, 2014

I consider this one my "masterpiece"!!!

For a while now, I've been working on a a 50th birthday card for my youngest stepdaughter who has been battling cancer for several years now and I wanted it to be VERY special....just as she is!!! This is what I've came up with and she loves it!


Here is a close-up of the "50", which was done using the "CentSchbook BT" font.  For the "looks good", I used the "CAC Lasko Even Weight" font and for "on you!" I used the "KG Second Chance" font and a Silhouette "Silver" sketch pen and all of these fonts can be downloaded for free online....just "google" them!  The flowers I used are from the Bridal Dept. at Michael's...I just used a flower sculpting tool to shape them, then enhanced them with a "Silver" Wink of Stella and added pearls to the centers.  I also used my Anna Griffin "Poppy" embossing folder, some Spellbinders Nestabilities and my Martha Stewart "Rose Leaf" and "Branch" punches that I brushed with my "Clear" Wink of Stella Brush Tip Marker.


I made this card into a pop-up and here is a photo of the inside.For the label at the top that says "so, kick up....", I used one of the labels from the "Labels Set of 4" which is a freebie cutting file from Bird's Cards...if you've never been to her site, you really need to go check it out!!!  The font I used is the "KG Second Chance".  For the "HAPPY 50th BIRTHDAY JANICE!", I used some parts from  a Silhouette file called "Happy Birthday Bunting" by Jennifer Wambach [Design ID #15364] and the "Calibri" font.  Now that one was a job as I used silver thread to "hang" the banners...but Janice is so worth it!  Now, for the absolutely adorable shoes and bag, I used another Silhouette file. "Shoe and Purse" by Sarah Bailey [Design ID #8799] which I cut out of Hot Off the Press suede papers and some silver mirror paper for the top of the purse!


Here is a close-up of the shoes and purse.


I always put a "signature label" on the back of my cards and personally sign them and I used another Silhouette file called "Decorative Artisan" by Snapdragon Snippets [Design ID #16056] to make that personal label that I signed.  I used the "Alex Brush" font on it.   Here is a photo of it.


And now, last but not least, here is a photo of the box that I made to house the card as it was way too thick for an envelope.  I used an old Cuttlebug corner die to cut some corners and I cut an oval on my Cameo and embossed it with my "Poppy" embossing folder to go around the oval on the front.  I just used a piece of acetate for the oval window.


This card was a lot of work but also a lot of fun to make and our Janice is well worth it!  Please keep her in your prayers.  Thanks for stopping by!!!

Finished Card Size:  A7 (5"x7")


Supplies List

Papers:  Recollections "Ivory" 110 lb., DCWV "Glitter Papers",  Hot Off the Press "Smoke Suede" & "Black Suede", My Mind's Eye "Wild Asparagus" blue/brown stripe #WA2020
Tools:  Silhouette "Cameo", Spellbinders "Grand Calibur"
Accessories:  Gardner "Brides Flowers", Recollections "Pearls", "Silver" & "Clear" Wink of Stella Brush Tip Markers, Spellbinders Nestabilities "Petite Ovals LG", Martha Stewart "Rose Leaf" & "Branch" punches, Anna Griffin "Poppy" embossing folder

Monday, February 10, 2014

A little Valentine "freebie" for y'all!!!

So sorry that I did not get back here the other day....but with Dr.'s appointments for both my husband and myself, trying to get this card design and a birthday card completed, I just simply ran out of time!  I will get back it...just may take me a bit, so don't give up on me...LOL!

At any rate, I designed this little valentine card that I am sharing with y'all, but I have to be honest and tell you that I have not done a test cut on it...........so you may want to try cutting it on some scrap paper just to make sure it will cut well.

Here is a screen shot of it:


You can go here to download the zipped file, which includes MTC, Studio, SVG formats as well as a JPEG.  Enjoy and Happy Valentines Day to all!!!


Sunday, February 2, 2014

Christmas Card for my oldest son!

OK y'all, this is where I will start catching up....with this card.


I used some Silhouette files to design this card.  The files are:  Merry Christmas Tree by Lori Stevens, Design ID #14865 and Merry Christmas Tree - Separates by Lori Stevens, Design ID #14866 and the border I used down the side of the card is Loop Lace Border by Snapdragon Snippets, Design ID #15309.  I love the DCWV, "The Glitzy Glitter Stack", glitter papers that I used on this card, but I'm afraid they did not photograph well at all...you will just have to use your imagination.  Here is a view of the inside of the card:


On the left, there is a pocket that you can use for a gift card, cash or a check.  I also want to note that I used the "LDT Eesome" font from Lettering Delights and I did the text using the HotPaws Pen Tool for the Cameo (she also makes pen tools for most of the other cutters too), which is awesome!!!  I used one of my PaperMate EraserMate Pens in it, which stays wet and then I was able to use some White Opaque Embossing Powder and my Ranger "Heat It"to heat set it....and it looks so cool.  If you are interested in the HotPaws Pen Tools, you can find them here.  One of the things I like about them is they are so affordable and you only have to purchase one and you can use many, many different size pens in that one pen tool, not to mention that she has great customer service!

Thanks for stopping by and I will be back in a few to post the next one!!!

Saturday, February 1, 2014

Check out my Dollar Tree Fun Foam "Paw Print" Stamp!!!

Oh WOW.....have I been playing today or what???  I think it was last week that I was playing with the Dollar Tree Fun Foam, which is super thin and I am able to cut it with my Cameo.  Here is a photo of my test cuts.


For those test cuts, I actually used my Click It 'n Cut! Click Blade Holder to the do the cuts.  I did the first cut with the Blade at 3, Speed 3 and Thickness 33 and then did a second cut with the Blade at 4. Funny thing is that the orange piece of fun foam already had a hole in it!  By the way, the package I bought has ten sheets of 8"x12"......two each of orange, blue, yellow and green.  Pretty good for just a $1!!!

Well, this afternoon after playing with my "paw print" file that got me to thinking that I should make me a "stamp" out of my file.  I actually wanted to make it with a bunch of paw prints but that did not work out so good, so I wound up making a single "paw print" stamp.  For the base, I used some Recollections 110 cardstock and then I cut two layers of the fun foam.  I first glued one layer of the green fun foam to the white base using Aleen's "Clear Gel Tacky Glue", let it dry and then glued on the second layer of the green fun foam.  Then I used some Aleen's "Tack-It Over & Over" to the bottom of the base layer, which after you let it dry good is repositional and thus I was able to use it with an acrylic block.  It worked great and I was even able to clean it with stamp cleaner....not perfect, but pretty dang good. Here are some photos!


I also want to mention that I cut the paw prints with my Cameo, one pass with the Blade set to 9, Speed 1, Thickness 33 and it cut perfectly!!!  I don't know how long this little homemade stamp will last but if it wears out, I saved my cut file and I will just cut another one...lol!!!  Hey, thanks for stopping by twice in one day!


Use your Washi Tape to make Templates!!!!

Hey y'all............sorry I've been so bad about posting, but I've truly been VERY busy.  I've made a bunch of cards that I could not post until the recipients received them and then, you've got it...got too busy on other projects to get the previous ones posted!  So, I'm getting ready to catch up soon, I promise!

At any rate, this morning I came up with something I just have to share.  I've been  working on a birthday card for a really close online friend and while working on it this morning, I came up with an idea.  I wanted to put some paw prints on the top inside of the card, which I had cut out of some black suede (I personally call it velvet) on my Cameo.  The problem is that they are very tiny and each paw print has five pieces, which would take a lot of time to adhere to the card, so I got to thinking about what I could do to speed things up and that got me to thinking about Washi tape.  I have one roll that is 1.25 inches and that would be about prefect.  So I cut me a piece of it 4 inches long.....went into my Silhouette software and designed me a 4"x1.25" file to cut my template and it worked wonderfully!!!  I am so excited.  Here is a photo so that you can see what I am talking about!


The white paper at the top with the paw prints is the top inside of my card and I adhered my Washi tape template to some yellow paper so that you can see what I'm talking about.  You just place your template on your project and then I used my Ivy Hollow "Scrap Fusion Glue" with the needle top applicator to place dots of glue in the openings of the template and started placing my teeny pieces of the paw prints in the openings and as soon as they were dry, I removed the template.  In the plastic container is my little teeny suede paw print cut outs.........you can see how dang tiny they are!  I will be posting this card as soon as the recipient receives it.  Now I will save my cut template to use again and I also saved the file so that when that piece of Washi is no longer sticky enough, I can just cut me another one!  I see SO many possibilities with this use of my Washi tape!

By the way, I just want to mention that I absolutely love my "Scrap Fusion Glue" and the needle point applicator.  It is my favorite adhesive of all time and since I purchased it back around the first of December, I have hardly used any other adhesive!!!!

Gotta run finish this card and another that I working on and then I will get to posting my projects.  Thanks for stopping by and I will be back soon!!!