Sunday, November 23, 2014

I am SO loving my MISTI!!!!!!!!!!!!!!!!

Y'all, I have to admit that prior to purchasing my MISTI, I really was not very much into stamping......but I am now!!!  Iliana, at My Sweet Petunia and the creator of the MISTI is now taking pre-orders for this fantastic tool.  Here is link to her blog post telling all about it......so go check it out and order one............I promise you won't regret it!!!  I got mine back on October as a late (birthday is in September) birthday present and I love it more every day!!!

Believe it or not the card I just made and that I'm about to post photos of, totally started with this image of a holly stamp in the Recollections "Winter Wonderland" stamp set that I just purchased at Micheal's this week!!!


This is the stamp set and it was on sale for 40% off!!!
                 

When I looked at the holly stamp I immediately thought of making a holly wreath using it.  To make the wreath, I stamped the image in black, scanned it and opened it in my Cameo software where I proceeded to turn it into a wreath by taking the image around a circle, making it a compound path and doing an offset and then I did another offset to get the "mat".  After cutting the wreath image out, I then used my MISTI to stamp the image around the wreath and covered the "berries"  with some pink liquid pearls.  The "mistletoe" is a Silhouette file and I added some white liquid pearls for the "berries" on it, added some punched branches and a tiny pink silk bow that I made with my "Bow Easy".  I recently purchased the My Favorite Things "Blueprints 13" and I used the stitched rectangle and rounded edge label dies from the set on my card.  I used the edge label for my "Merry Christmas" sentiment which was stamped with another Recollections stamp from the "Merry Merry" stamp set.  Then I cut three more of the labels, glued them all together for dimension and used a green Copic marker to match the green metallic cardstock that I used, to "paint" the edges and I really like the way it looks.  I'm going to use this card for the Splitcoast "Try a New Technique" Challenge (TLC509), "Layered Die-cuts".   Here are some photos.


I want to point out that I used a pigment ink for the sentiment and then embossed it using clear embossing powder.

Y'all I want to mention once again how much I am loving my MISTI.....and no, I am not on her payroll or anything else....I just think it's the greatest tool around for stamping!!!  Do yourself a huge favor and go get one..............you won't be sorry!!!

Finished Card Size:  A2 (4.25"x5.5")
Supplies List
Papers:  Recollections 110 lb. Ivory (card base), 110 lb. & "Champagne" 65 lb. "Dark Green" DCWV "The Shimmer Stack"
Stamps:  Recollections "Winter Wonderland" & "Merry Merry" Stamp Sets
Ink:  Tsukineko Brilliance "Thyme" Pigment Ink
Tools:  Silhouette "Cameo", "MISTI", "Milwaukee" Heat Gun
Accessories:  May Arts 100% Silk Ribbon,  Hampton "Clear" Embossing Powder, Ranger "Petal Pink" & "White Opal" Liquid Pearls, Recollections "Pink" Pearl, Martha Stewart "Branch" Punch, My Favorite Things "Blueprints 13 Stitched Rectangle & Rounded Edge" Dies

Monday, November 17, 2014

Happy Birthday Sweet 16!!!!

Our oldest great grandchild, Jodi, is turning 16 tomorrow and I just had to make her a special card for this milestone birthday!!!  I totally cased this card from an image that I saw on Pinterest.  I did not have a pink rhinestone flourish (or any rhinestone flourish for that part) on hand, so I took a package of pink rhinestones by Offray that I had purchased from Walmart and made my own!!!  I used a pencil in my Cameo Pen Tool to made little pencil marks to guide me in placing the rhinestones and it worked out just great...........even if it was a lot of work!!!  I made the "Sweet 16" using the Samantha font and cut with my Cameo.  I used some silk ribbon to make the bow.  The tiny pink frame is just that....a tiny frame, so the card is actually one layer and is entirely black and pink.  I also want to mention that this is a "tall card" (4.25x8.5 inches) and really looks very elegant!  


Here is a close-up of the "sweet 16".


For the "signature label" on the back of the card, I used a cutting file by my friend Teri Frank, using the "LD Dainty" font.


Thanks for stopping by for a visit.  I probably will not be crafting very much in the next couple of weeks as I have a lot to do to prepare for Thanksgiving....I will be having a lot of family coming in and I'm really looking forward to a fabulous family "get together"!!!  I want to take this time to wish you and yours a wonderful Thanksgiving!!!

Finished Card Size:  4.25"x8.5"
Supplies List
Papers:  Recollections 110 lb. Black (card base), 65 lb. Black and Pink, DCWV "Pink Glitter Paper"
Ink:  Tsukineko "VersaMarkWatermark"
Tools:  Silhouette "Cameo", Ranger "Heat It"
Accessories:  May Arts 100% Silk Ribbon,  Jolee's Boutique "Dual Tone Prizm Spinel", Offray "Gems", Suze Weinbert "Ultra Thick Embossing Enamel", "Clear" Wink of Stella Brush Tip Marker

Wednesday, November 12, 2014

Sending Lots of Hugs for Alyssa!!!!

Hello everyone!!!  Our son-in-law's sister's middle child, who is just 15 years old and has MS just started a series of four surgeries that she is going to have to go through.  I'm not sure what all they will be doing in the three upcoming surgeries, but in this one they broke both of her ankles and she is in casts almost up to her knees and in a wheelchair, not to mention in quite a bit of pain and I wanted to make not just a "get well" card, but an "encouragement" type card.  I knew I wanted to send her "hugs" and my first thought was it had to have a little bear, so it all started by me looking for a bear image on Google that I could color with my Copics and I found one that I think is absolutely adorable!!!  I made it into a "print and cut" file to cut with my Cameo and I used the colors for the Splitcoast Color Challenge (CC504)...or least as close as I could get and instead of using white for the card base, I used a cream card.  I used a rectangular stamp ("Extravagant Frame 477" by SweetStamps.com - you can find it here) to make a square frame cutting file for the card and then I took some of the elements in it and made an oval for the aperture in the frame.  I used my Simon Says "Sending" stamp from the "Sending Happy Thoughts" set....which I made a cutting file for and cut several so I could glue then together and prop them up on the oval.  I also used some ultra thick embossing enamel on it.  I made a cut file for the tiny flowers to place on top of the cute bear's bows, covered them with Glossy Accents (also used the Glossy Accents on the bear's nose and eyes) and placed a tiny pearl in each one which I colored to match my design using one of my Bic markers.  I also used the ultra thick embossing enamel on the little hearts.  Of course, I just had to use my Wink of Stella to enhance the bows, flowers on the bear's outfit and on the butterfly plus the little hearts on the oval frame.  The "you lots & lots of bear hugs!" was computer generated using the "2 Peas Mr. Giggles" font. Here are a couple of photos of the card front.  


For the inside of the card, I designed a matching border to cut with my Cameo, found a very appropriate poem online and used the "LD Pretty" (Lettering Delights) font and added a few more flowers and hearts.


I had cut an oval in the early design process that I wound up not using on the card front, so I just used it to make my "signature label" to cut using my Cameo and it worked like a charm even though it is a little large .....but that's okay!!!


I found a piece of Recollections patterned paper that had colors that I liked and made my envelope and even cut some little strips of it to decorate the envelope flap!


I will be getting this in the mail to Alyssa tomorrow....I hope she likes it and that it cheers her up and encourages her!  Thanks for stopping by and please don't forget to leave your comments below as I love reading them!!!

Finished Card Size:  5.5"x5.5" Square
Supplies List
Papers:  Recollections 110 LB "Ivory", 65 LB "Cream" & "Garden Floral Paper Pad", DCWV "Cotton Bloom Stack", Bazzilll "Smooth white"
Stamps:  Simon Says "Sending Happy Thoughts" 
Ink:  Tsukineko "VersaMark Watermark"
Tools:  Silhouette "Cameo", Ranger "Heat It"
Accessories:  "Clear" Wink of Stella Brush Tip Marker, Suze Weinberg "Ultra Thick Embossing Enamel", Recollections "Pearls",  Copic Markers

Friday, November 7, 2014

I LOVE my MISTI & a Splitcoast Card Sketch Challenge

OK y'all, gotta talk to ya about my latest "craft toy".  I don't know if y'all have heard of the MISTI (Most Incredible Stamp Tool Invented), but it REALLY is!!!  In my opinion it was invented by a young lady who is a genius.  Her name is Iliana Myska and in addition to being a crafter, she is a wife and a Mom and she home schools her daughter!!!  The best way to understand this tool is to watch her videos on YouTube and here is a link to them.  At first I thought this was a bit pricey.........but trust me, it is worth every penny!!!  This is what I wanted for my birthday in September and I started trying to purchase one in August, but every time she had some they sold out, so it was almost a month after my birthday had come and gone before I was finally able to get one.

On Wednesday Splitcoast had a Sketch Challenge #513 and it was perfect for creating a card to use a new stamp set that my friend Tammy had given me for me birthday.........it is the "Happy Hexagon Stamp Set" by Papertrey Ink and I used it to stamp the diagonal border on the card front plus the border across the inside of the card.  By the way, I named my MISTI, "Misty" and there is no way I could have stamped that border without her....the Color Box inks that I used are pigment and to get a really good image I like to stamp the image three times and I don't think they would be that perfect if I had to use my Stamp-a-ma-jig with all the details on the different hexagons in that stamp set.  The card is only the base, the yellow cardstock layer and the top white layer.  I first stamped the diagonal border using a matching mask/stencil that I designed and cut using my Cameo.  Then I cut some some cardstock strips using my Cameo to finish off my border.  The tiny stars are actually some "Mini Sparkle Shapes" by Paper Crafting that I purchased years ago!  Here is a photo of the card front as well as an inside view!


Thanks for stopping by and don't forget to check out the MISTI videos...you will love all that it can do and hurry back!!!

Finished Card Size:  A2 (4.25"x5.5")
Supply List
Papers:  Recollections 110 LB "White" & 65 LB "Assorted Colors", Core'dinations "Great White Smooth Texture" (top white layer)
Stamps:  Papertrey Ink "Happy Hexagon Stamp Set", Simon Says Stamps "Sending Happy Thoughts"
Ink:  Tsukineko "VersaMark Watermark", Color Box "Banana Custard", "Chianti", "Lettuce" & "Cap Cod"
Tools:  Silhouette "Cameo", Ranger "Heat It", "MISTI"
Accessories:  Paper Crafting "Mini Sparkle Shapes", Hampton Art A La Mode Pastel Embossing Powder

Wednesday, November 5, 2014

Congrats card for youngest granddaughter & FREE envelope file!!!

OMG........we are getting SO old!!!  So our youngest granddaughter on my husband's side just got engaged.......where in the world did the time go?  Seems like just yesterday she was a toddler sitting in my lap at the computer and now she's getting ready to graduate from graduate school in April and before long she will be getting married.  She and Andy will be in town this weekend and we will be having a little celebration with them, so I just finished a card I want to give them.

When I got the news, I had just finished turning a rectangular frame stamp, "Scroll Scissors Frame 476" (which you can find here) into a square cutting file and I thought WOW...this will make a gorgeous "congrats" card!  Here is what I came up with.


I don't know exactly what color this Recollections paper is....one minute it looks powder blue and the next it looks pale green..............so I guess it is a lovely mixture of blue and green!!!  It is from the Michael's Recollections "Seaside" 65 lb. collection.....all I know is that it is gorgeous!!!  After taking the elements from the stamp and making the 5.25 inch square frame with a circle aperture, I decided I wanted a circle frame for the card center, so I designed it using the same design elements and then I designed a "border", "signature label" and "envelope flap" as well!  I did not have a "congrats" die, so I designed one using the "Samantha Font" that I just recently purchased............I LOVE that font!  I cut three of the "congrats" and glued them together and used my "Clear Wink of Stilla" on the top layer.  I used my Spellbinders circles dies to cut a white scalloped frame to go beneath the circle frame I designed.  The little matching pearls were created by me using The Frugal Crafters method for making enamel dots......there is a link to her YouTube video in my previous blog post.  I used foam tape to elevate the frame from the base card and then I actually cut a piece of self-adhesive fun foam to elevate the circle frame.  To finish off the card front, I just added four "Mark Richards Pearl Perles".  Here is a close-up photo.


When I got ready to do the inside of the card, I got to thinking that it would be very lovely to use velum so I took the border that I had designed and made a cutting file for a vellum mat with the same outer edges as the border so that I could adhere a border on the top and the bottom.  I printed my message on my Canon printer using the matte setting so that I would lay down more ink and then as soon as the printing finished I used some clear embossing powder and heat set it so that my message is embossed...much more elegant than regular printing!  I used the "Samantha Font" for the entire project.  Here is a photo.


Here is a photo of the back of my card showing the "signature label" that I designed to match.


I decided I needed a really elegant envelope to place this card in and the cardstock that I wanted to use for it is some Core'dinations Great White Smooth Texture that I purchased from Joann's some time back and is 8.5x11, so I had to use an envelope cutting file that I had designed some time ago that is cut in pieces and then glued together,  Here is a jpg so that you can see what the cut file looks like.


I love this envelope design because it enables me to use letter size papers and cardstock to make envelopes that I would normally only be able to cut on 12x12" size papers.  If any of you would like my cut file you can download it free here in Studio and SVG formats!  Enjoy!  I had an extra "congrats" cutting that I adhered to the front of the envelope and I cut a Spellbinders heart to seal the back.  Here are some photos of what my finished envelope looks like!


I just about forgot to post this photo showing the envelope flat that I designed!!!


Hey, thanks for stopping by............please don't forget to leave comments as I love to read them and don't forget to download the free envelope file.  Hurry back!!!
Finished Card Size:  5.5"x5.5" Square


Papers:  Recollections "White" 110 LB Cardstock {card base), Recollections "Seaside" Collection 65 LB. Cardstock, Staples "While Inject Vellum", Core'dinations "Great White Smooth Texture"
Tools:  Silhouette "Cameo". Sizzix "Big Shot", Ranger "Heat It" 
Accessories:  "Clear" Wink of Stella Brush Tip Marker, MarkRichards "Pearl Perles",  Hampton "Clear" Embossing Powder, Suze Weinberg "Ultra Thick Embossing Enamel", "Samantha Italic Pro" font by Laura Worthington, Spellbinders ""Standard Circles SM (S4-116)", Petite Scalloped Circles SM (S4-117)" and "Photo Corners (S3-107)"

Saturday, November 1, 2014

Check out my "door sign" for my great niece!!!

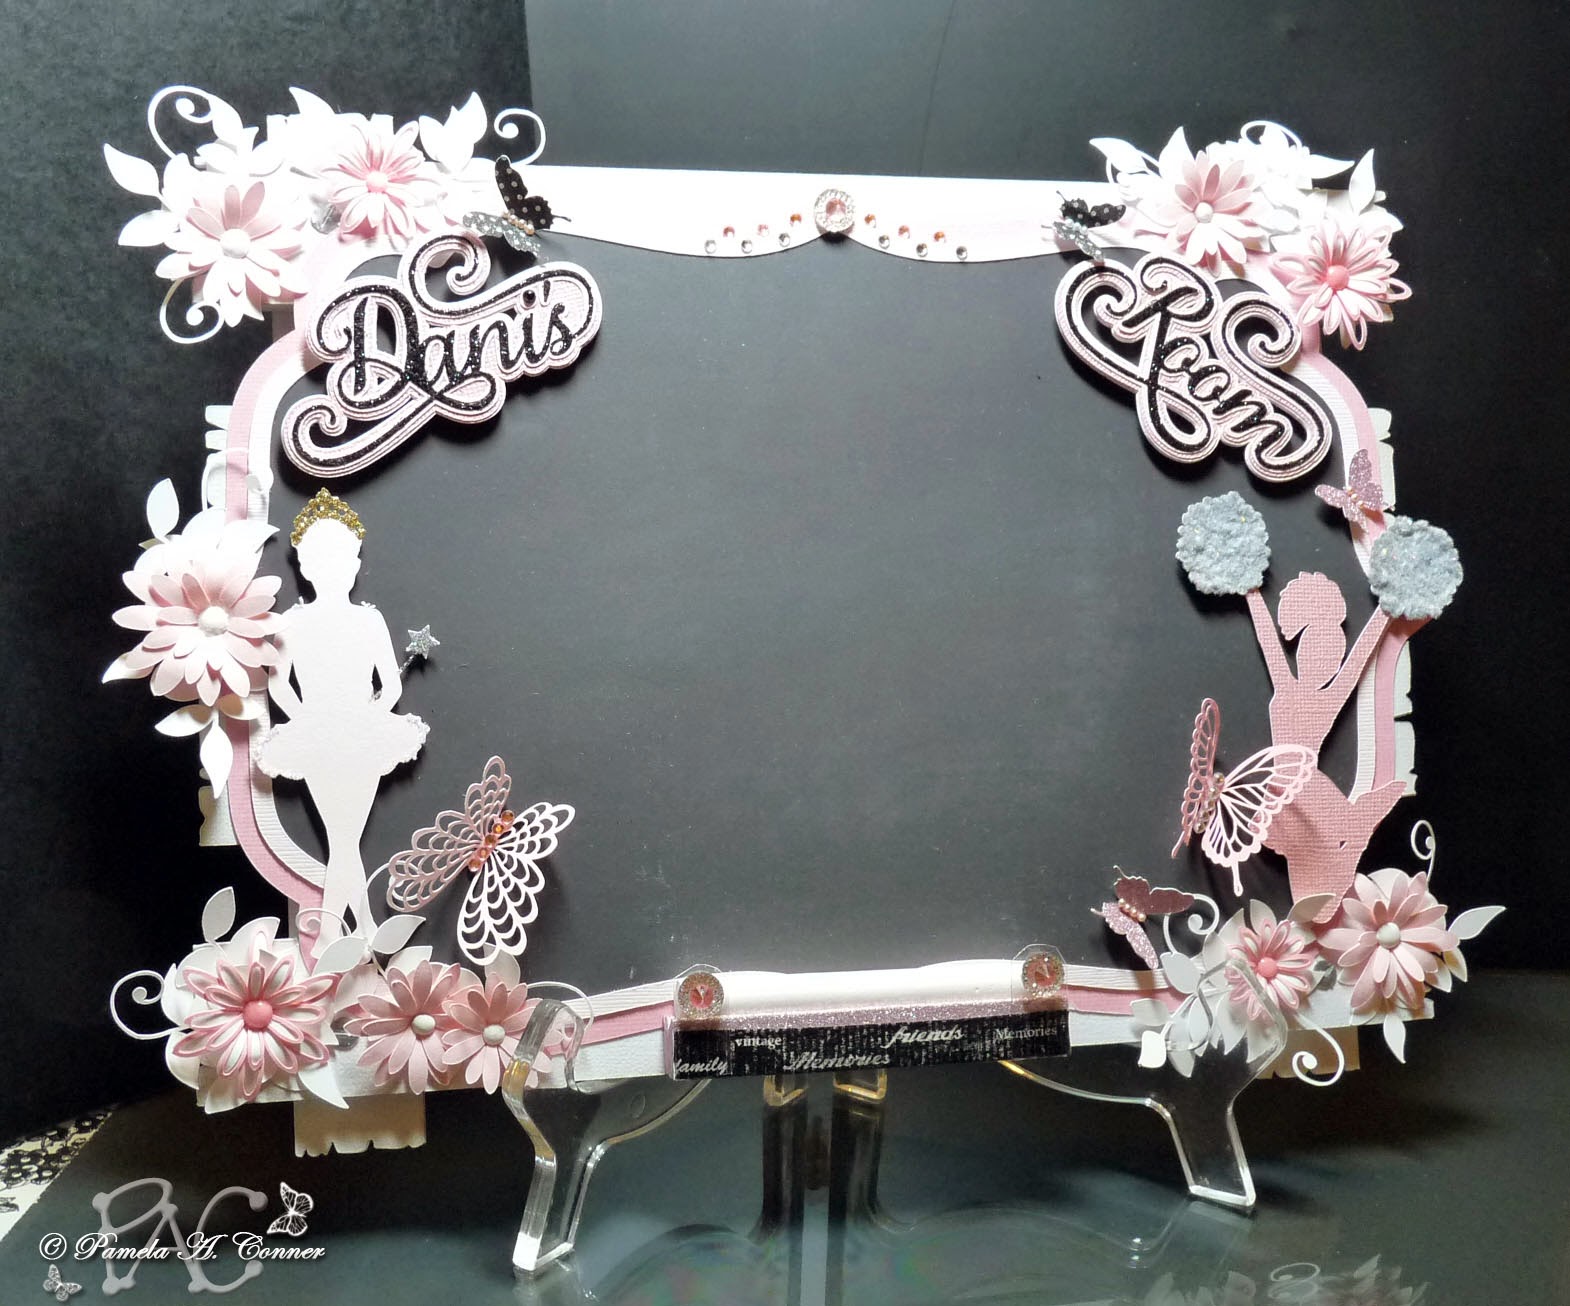
Hello everyone!!!  I have been very busy...just not making cards right now.  In addition to designing and creating this door sign for my sweet great-niece Dani, I have been designing some files and trying to organize and clean up stuff in my Craft Room.........that is an endless job as we all know!!!

At any rate, I have been telling my sister's eight year old granddaughter for quite some time now that I was going to make her a sign for her bedroom door and it just so happens that they will be here for Thanksgiving, so I figured that would be a great time to give it to her.  I have to say, this has been quite a project!!!  I got the idea in my head that I wanted the "back-drop" of the sign to be like a wood slat sign and I wanted the main focus of the sign to be a "chalk board" so that she could take the chalk and write "keep out", "enter at your own risk" or "sleeping" or whatever her little heart desires!  Here is a photo of the finished project and beneath it are a bunch of close-ups and at the end of this post there will be some photos of how I accomplished the "wood slat" base for the sign.  Everything, with the exception of the foam core supports, was designed and cut using my Silhouette Cameo.


"Dani's" and "Room" were designed by me using the Samantha font which I just recently purchased and I love it!!!!  The top layer of each was cut out of black cardstock, then covered with my "Sparkle N Sprinkle Brushable Glue" and then I sprinkled and burnished some Martha Stewart "Onyx" glitter on it.  The "ballerina" and the "cheerleader" were images I found online and turned into a cutting file for this project.  I cut the daisies on my Cameo and then "sculpted" them to shape and for the flower centers I used "The Frugal Crafter's" idea for making enamel dots out of paper.....you can see her video here!  I swear, I just love Lindsay's ideas ....that woman is pure genius!!!  That gorgeous light pink butterfly is a Sue Wilson die.............the other butterflies are Silhouette cut files.  The lovely "greenery", which in this project is white..lol, is a free cut file called "Viney Leaves" that I got from The Scrap Chick.  For the cheerleader's pompoms, I used "Platinum" flock by Sparkly Fluff.   The three large pink and clear spinels are by Jolee's Boutique and the tiny pink and clear gems are by Offray.  The pearls are Recollections.  The following are close-ups as my full photo is not that good, but hopefully the close-ups will make up for it!

Top Left


Bottom Left featuring the Ballerina and Sue Wilson Butterfly


Top Right


Bottom Right featuring the Cheerleader


Now, I 've got to talk to you about my "chalk well"............now that was a job to figure out.  I wound up taking two pieces of foam board and gluing them together and then I took my craft knife and cut out a well for the chalk to sit in.  Then I took some Sandy Lion glitter tape and covered the foam board and then I took a piece of black washi tape and placed it on the front for some contrast.  Now....how in the world was I going to keep the chalk from falling out?  Well, a little bit of acetate works wonders............I cut a piece for each end and then applied a Jolee's spinel on each end for decorative and now the chalk is not going anywhere!  I have to say, I was rather proud of myself for this one....LOL!!!


Now for my method of making the "faux wood slat" base for the sign.  I found some wood slat images online and made myself a cutting file and cut three of each slat out of white textured cardstock, did a little inking with some black soot distress ink and glued them together and backed each one with a piece of foam board for support.  Can you tell that I love foam board...it comes in really handy for lots of projects!  I think the following photos pretty well show just what I did!


For the frame for the "chalk board", I used a free file from Images by Heather.....she has a number of free files that she shares...........you can find this one here!  There is three layers....the dark pink, light pink and the chalk board paper.


Hey, I am sorry for all of the photos...............but this was a BIG project.  Thanks for stopping by for a visit and please hurry back!!!

Finished Project Size:  about 9"x12"

Supplies List
Papers:  DCWV "Chalkboard" & "Glitter Paper", Bazzill,, Colorbok "White Textured", Recollections
Tools:  Silhouette "Cameo"
Accessories:  Martha Stewart "Onyx",  "White Gold" & "Florentine Gold" Glitter,  Jolee's Boutique "Dual Tone Prizm Spinel", Offray "Gens", SandyLion Tape Works, "Platinum" Sparkly Fluff, Sue Wilson Butterfly Die,